System Requirements
- PHP: 7.x+ for SkillTriks LMS
- Database: MySQL 5.8 or later
- WordPress version: 6.0 or higher
- Browser: Google Chrome, Firefox, Safari, Microsoft Edge
Installation
You can install SkillTriks just like any other WordPress plugin. For more help, pick one of the methods below.
Installing the SkillTriks LMS is simple. You can find it in the WordPress.org plugin directory or install it directly from your WordPress dashboard.
From the Admin Dashboard:
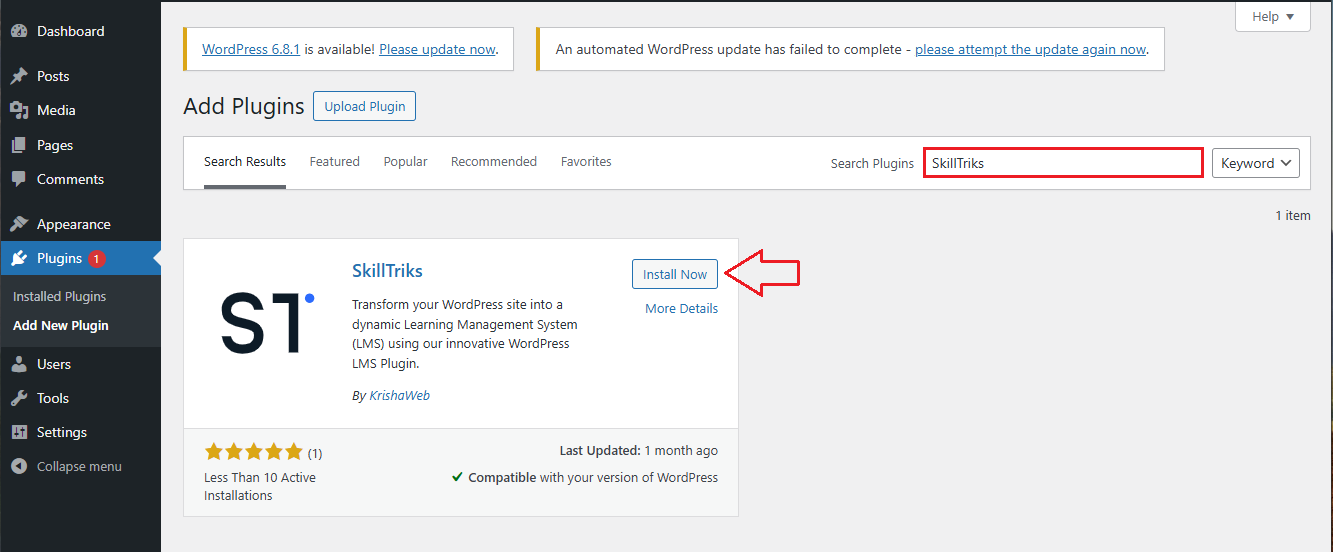
- Go to your WordPress Dashboard.
- Click on Plugins, and then Add New Plugin, and in the search box, type SkillTriks
- Find SkillTriks LMS in the results and click the Install button
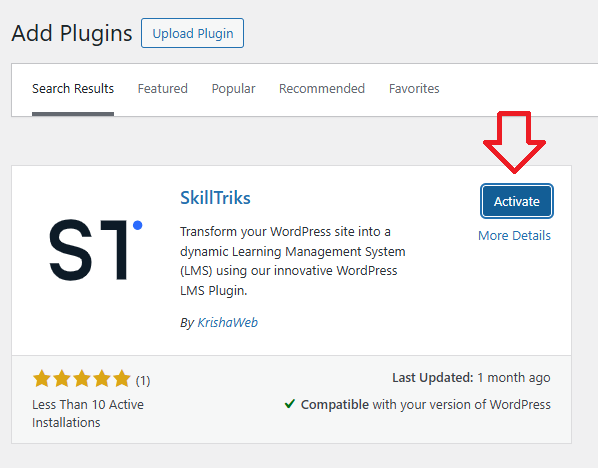
- Once it’s installed, click on the Activate button to start using the plugin
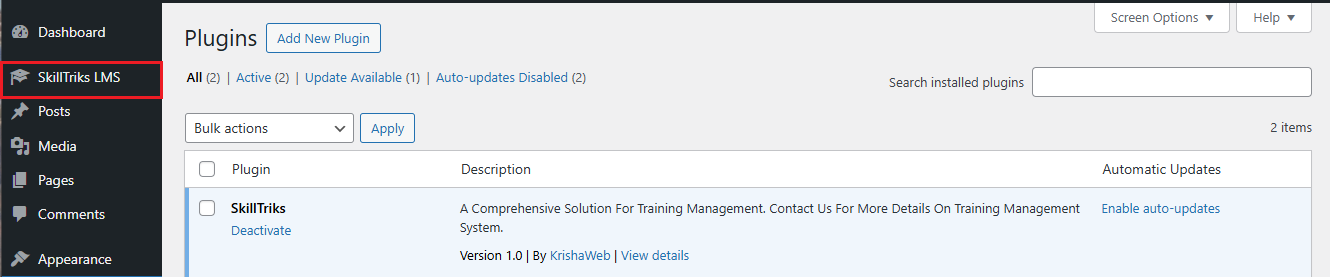
- Once the plugin is installed, you’ll see its name on the left-side menu. You can now start using it.
Manually
- Upload the SkillTriks folder to the /wp-content/plugins/ directory.
- Then, go to the ‘Plugins’ menu in WordPress and activate the plugin.
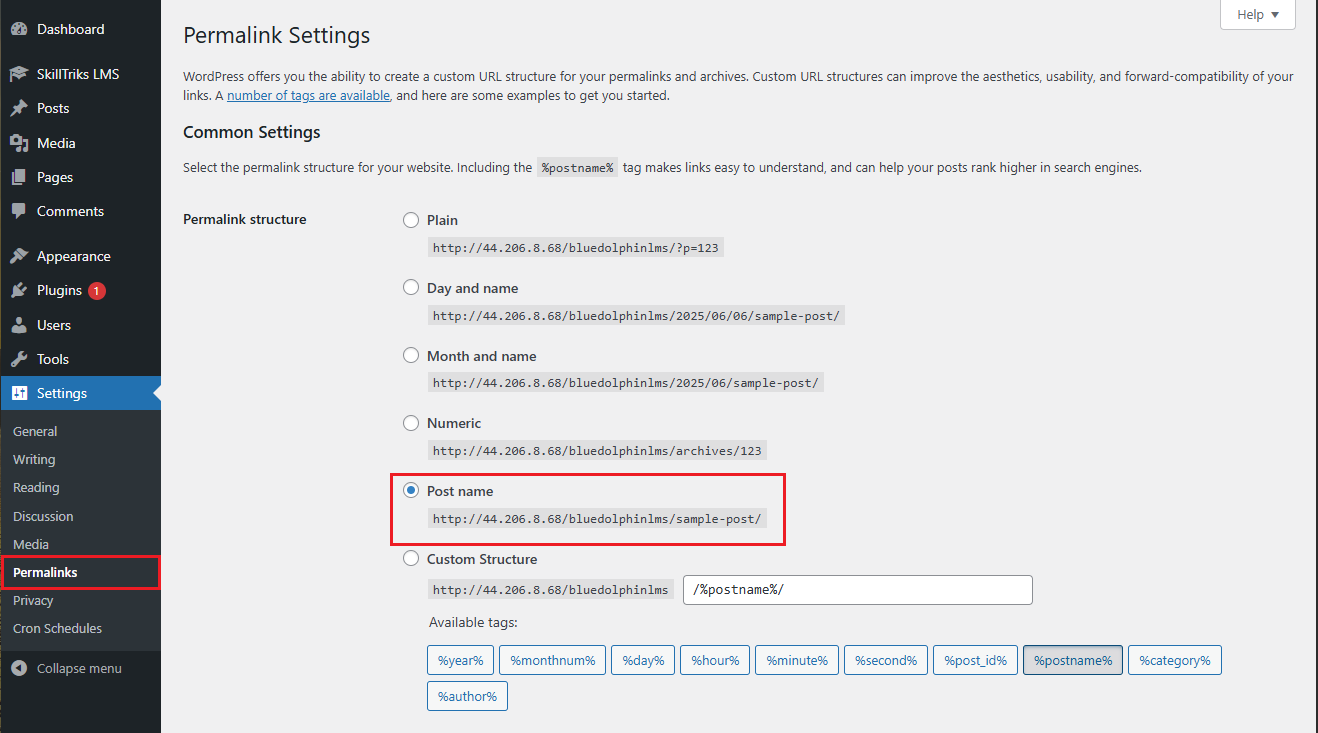
Permalink Settings
A permalink is the custom URL format for your website. SkillTriks needs the Post Name option to work properly because it uses that format for the dashboard and other links.
- To set it up, go to your WordPress Dashboard > Settings > Permalinks.
If you choose anything other than “Post Name,” you might see 404 errors on your site.
Introduction
Now, if you click on SkillTriks LMS in the left menu, you’ll see four submenu options. Here’s a brief introduction to each one:
- Questions: The user can add various types of questions here, including True/False, Single Choice, Multiple Choice, and Fill in the Blank.
- Quizzes: A collection of questions organized together to check how well learners have understood the lesson topics.
- Lessons: Small parts of a course that teach one topic at a time, typically featuring videos, text, or files.
- Courses: A full learning course with lessons and quizzes that teach a subject from beginning to end.
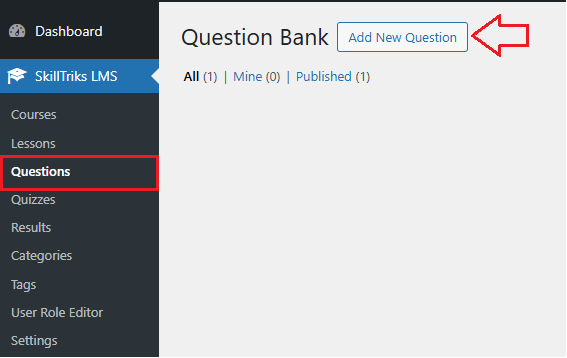
How do I create a new question?
- Click on the SkillTriks LMS Plugins.
- Click on the Questions menu, then click the Add New Question button.
- Now you can see different sections here, with a description below each one.
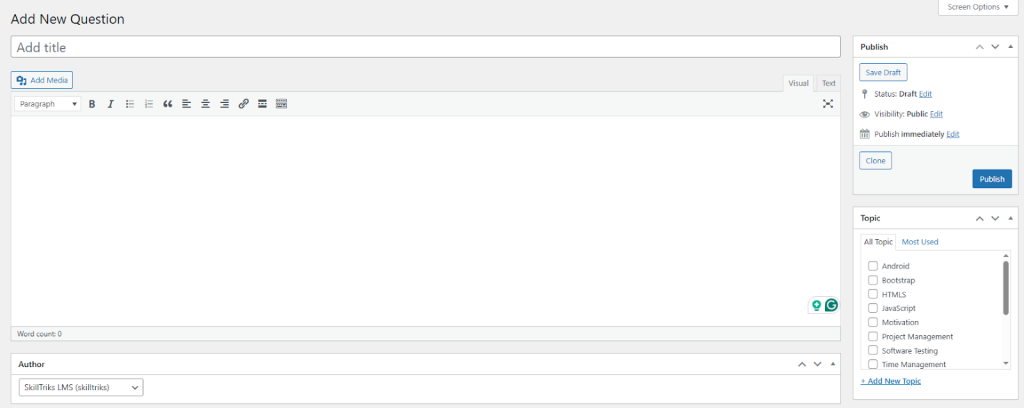
- Add title: Type the title of your question here.
- Save Draft: Click this to save your work without publishing it. You can edit it later.
- Clone: Makes a copy of this question.
- Publish: Makes your question live so others can see it.
- Add New Topic: Click this to create a new topic (category) for your question.
- Topic list: Choose from existing topics to organize your question.
SkillTriks LMS allows you to add four different types of questions. They are:
- True/False
- Single Choice
- Multiple Choice
- Fill in the Blanks
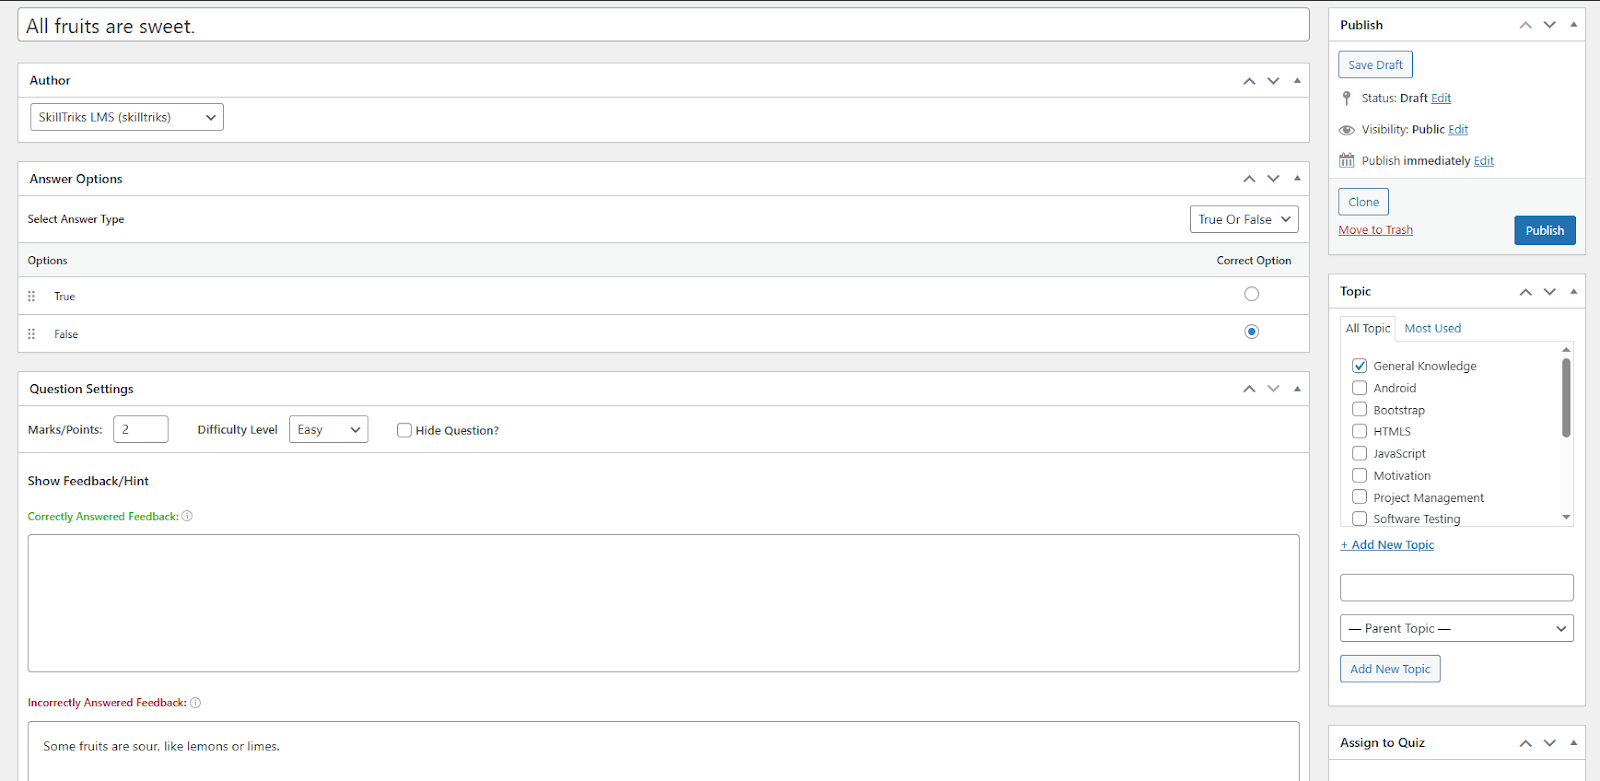
How can I create a True/False question?
The True/False question type lets you make easy questions where learners pick either True or False. To add a True/False question, go to the answer options and choose the True/False type.

Later, you’ll get the question setting section.
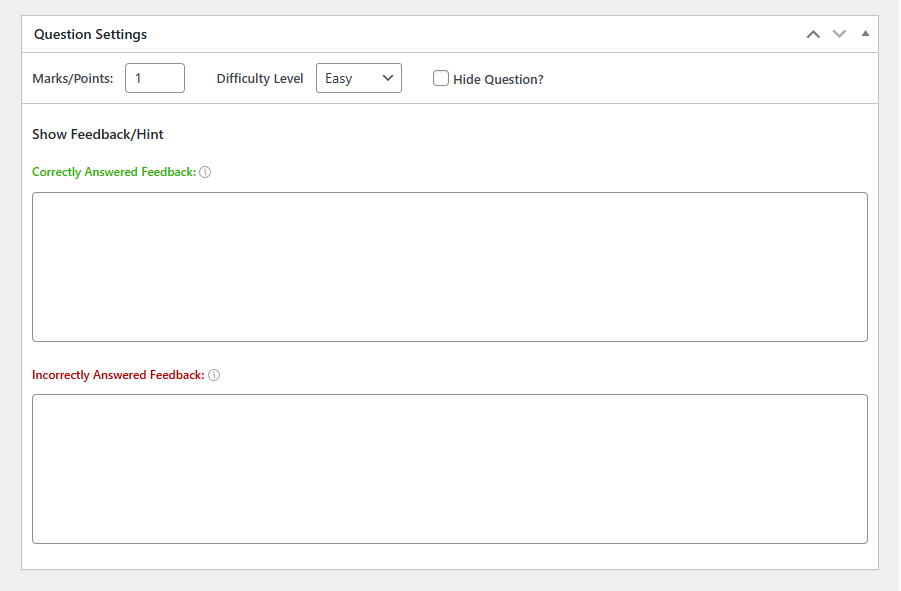
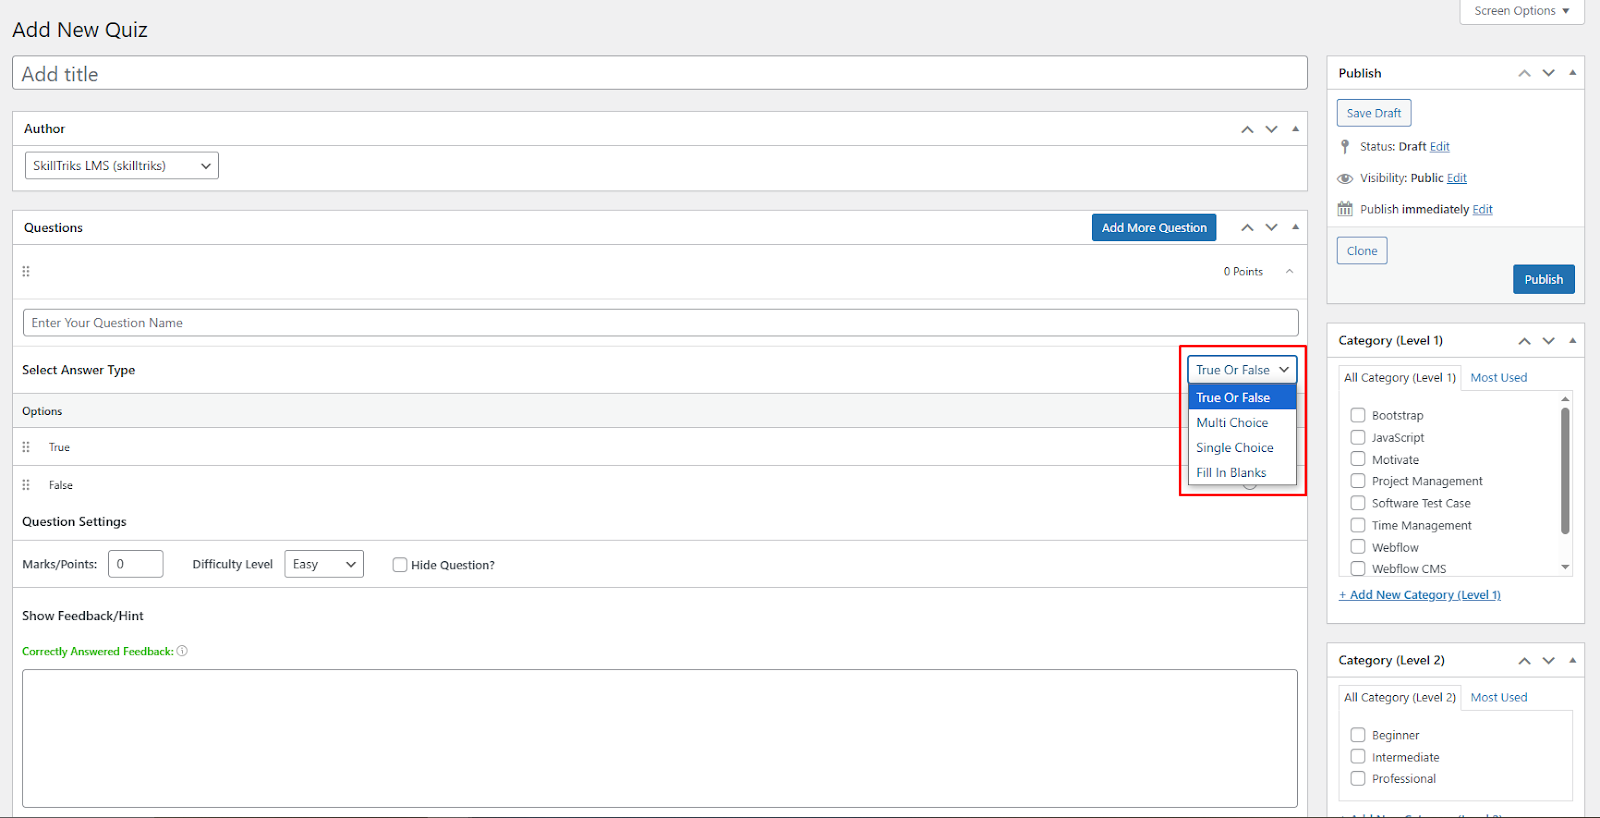
- Marks/Points: Enter how many points the question is worth.
- Difficulty Level: Choose how hard the question is (Easy, Medium, Hard).
- Hide Question?: Tick this if you want to hide the question from users.
- Correctly Answered Feedback: Write a message to show when the user answers correctly.
- Incorrectly Answered Feedback: Write a message to show when the user answers incorrectly.
Note: If Quiz Setting is turned off, you won’t see the answer explanation.
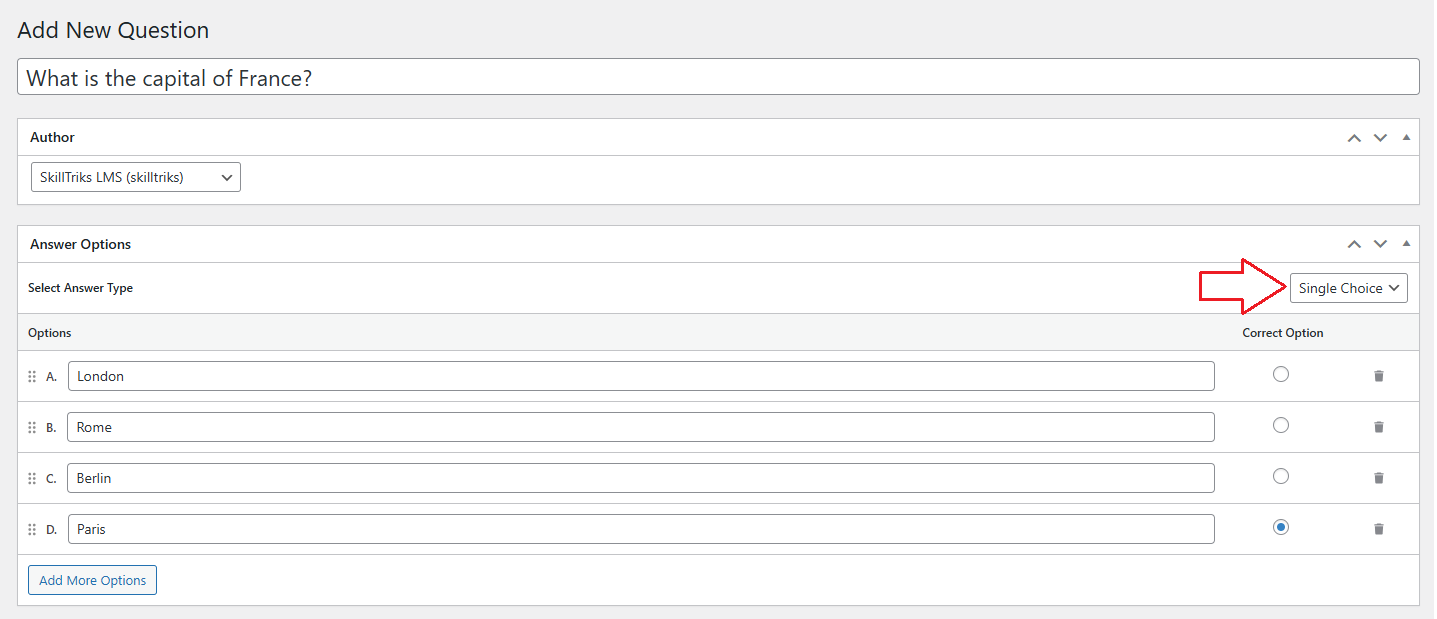
How can I create a single-choice question?
A single-choice question asks learners to pick one answer from many options. Only one answer is correct. To add a single-choice question, go to the answer options and choose the single-choice type.
- Add More Options: Click this button to add extra answer choices to the question.
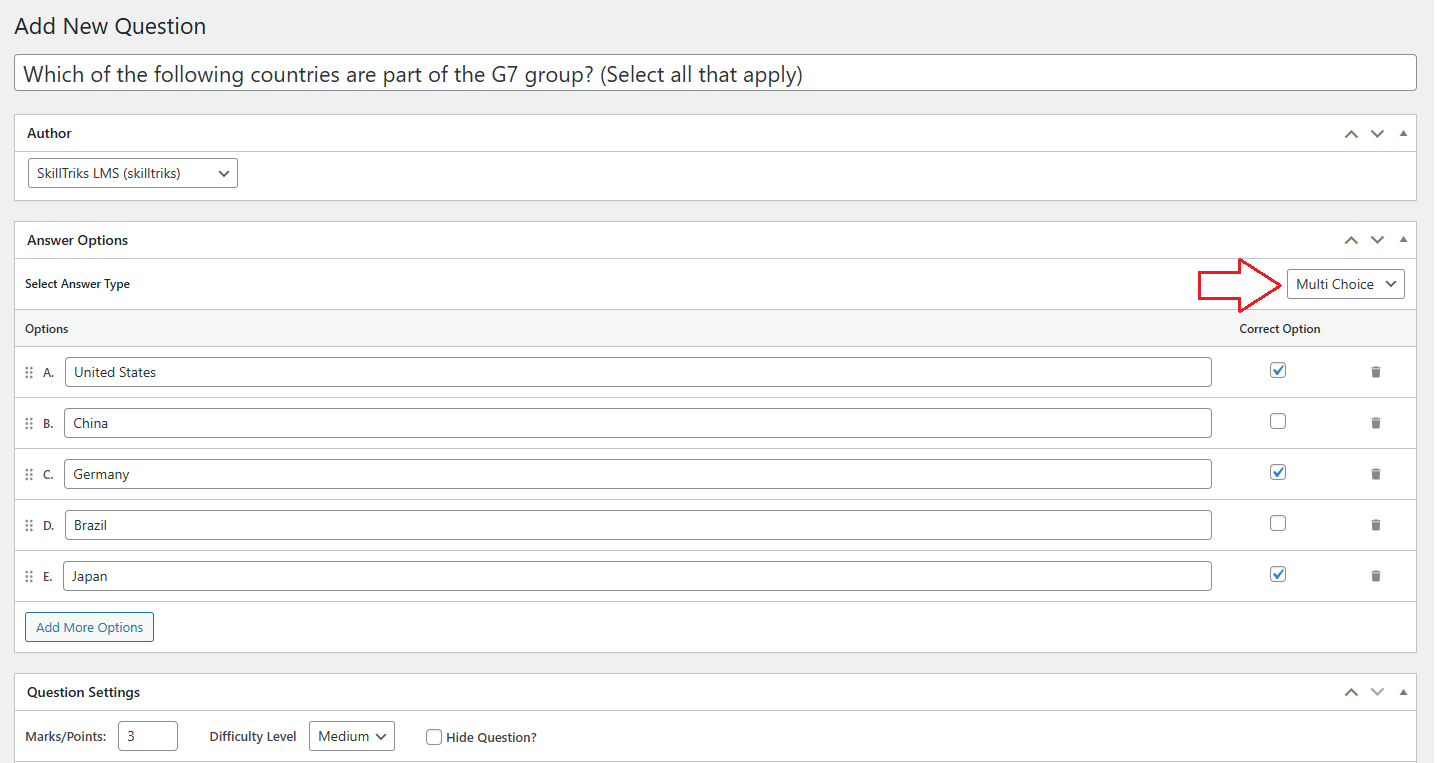
How can I create a multiple-choice question?
A multiple-choice question lets learners pick more than one correct answer from a list. It checks if they know all the right options. To add a multiple-choice question, go to the answer options and choose the multiple-choice type.
- Add More Options: Click this button to add extra answer choices to the question.
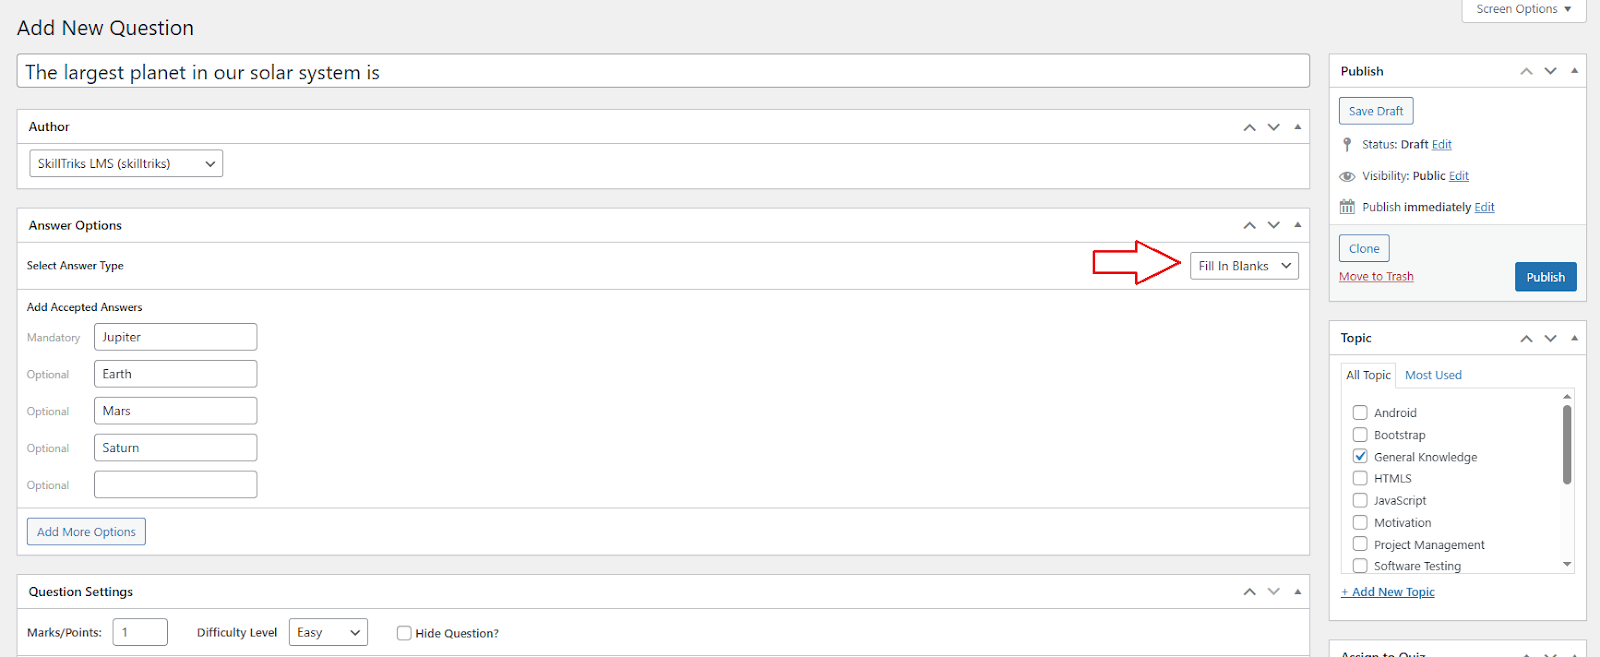
How can I create a fill-in-the-blank question?
In a fill-in-the-blank question, the user enters their answer in a text box on the frontend. There is a specific word that must be included in the answer(Mandatory). If the required word is missing, the answer is marked incorrect.
- Add More Options: Click this button to add extra answer choices to the question.
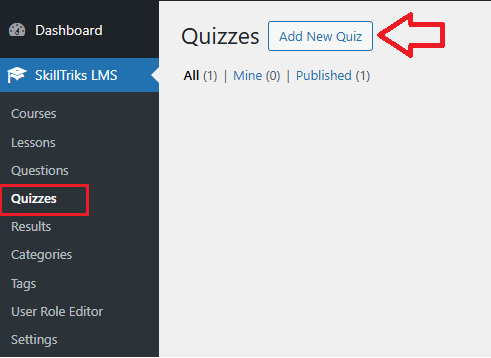
How do I create a new quiz?
- Click on the SkillTriks LMS Plugins.
- Click on the Quizzes menu, then click the Add New Quiz button.
- Now you can see different sections here, with a description below each one.
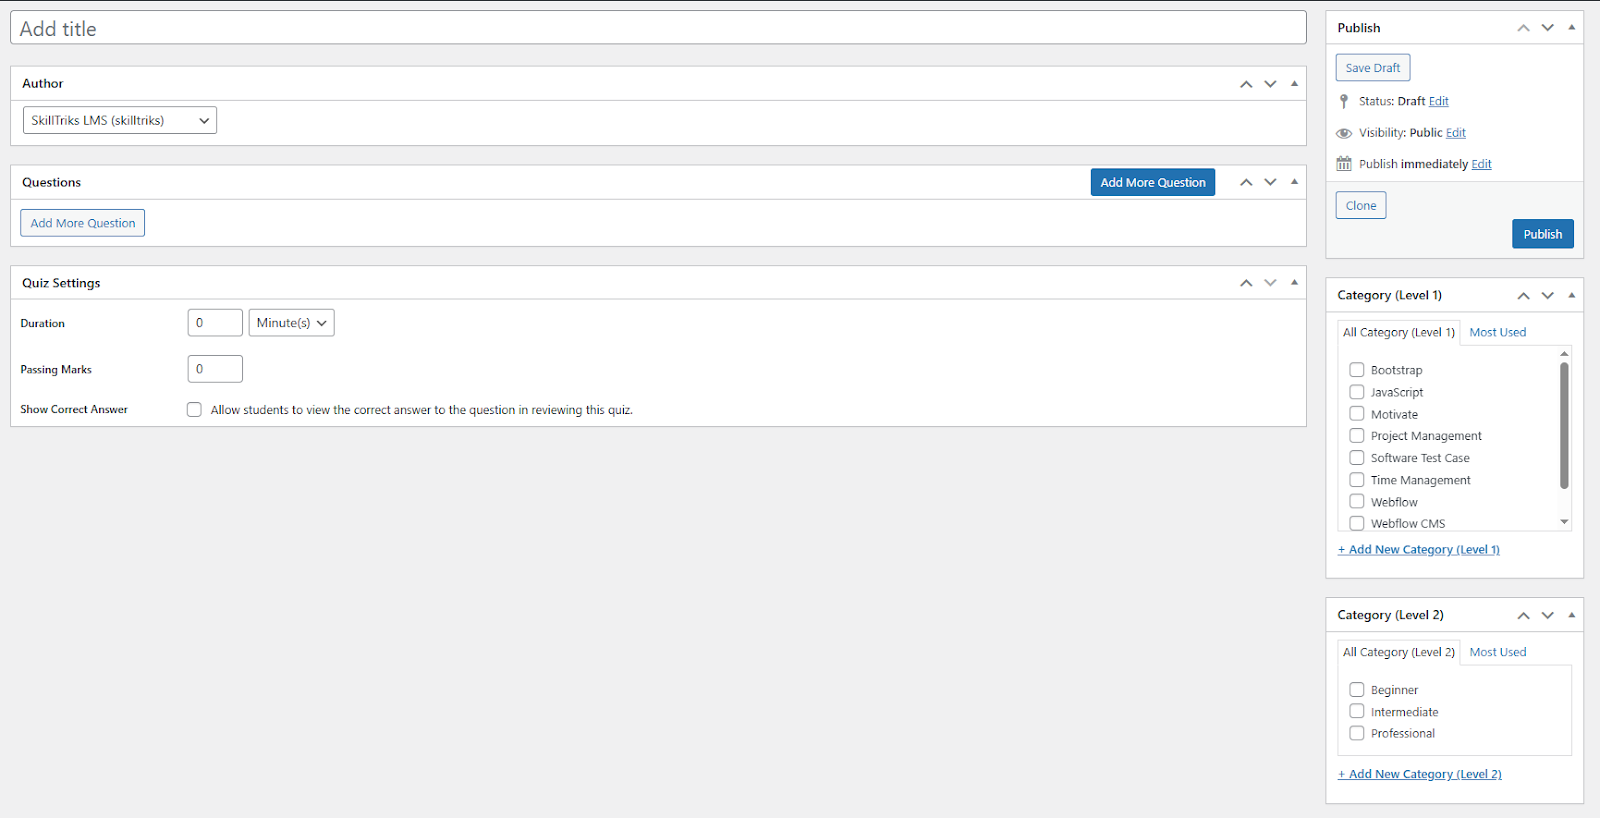
- Category (Level 1): This section allows you to select the primary topic of the quiz, such as JavaScript, Project Management, or Webflow. It helps group quizzes by subject.
- Category (Level 2): This section allows you to select the difficulty level of the quiz, like Beginner, Intermediate, or Professional.
You can think of Level 1 as what the quiz is about, and Level 2 as how hard the quiz is.
You can now add questions to the quiz in two ways:
- Create your own questions
- Choose from existing questions
You will see these two options only when the admin clicks the “Add More Questions” button.
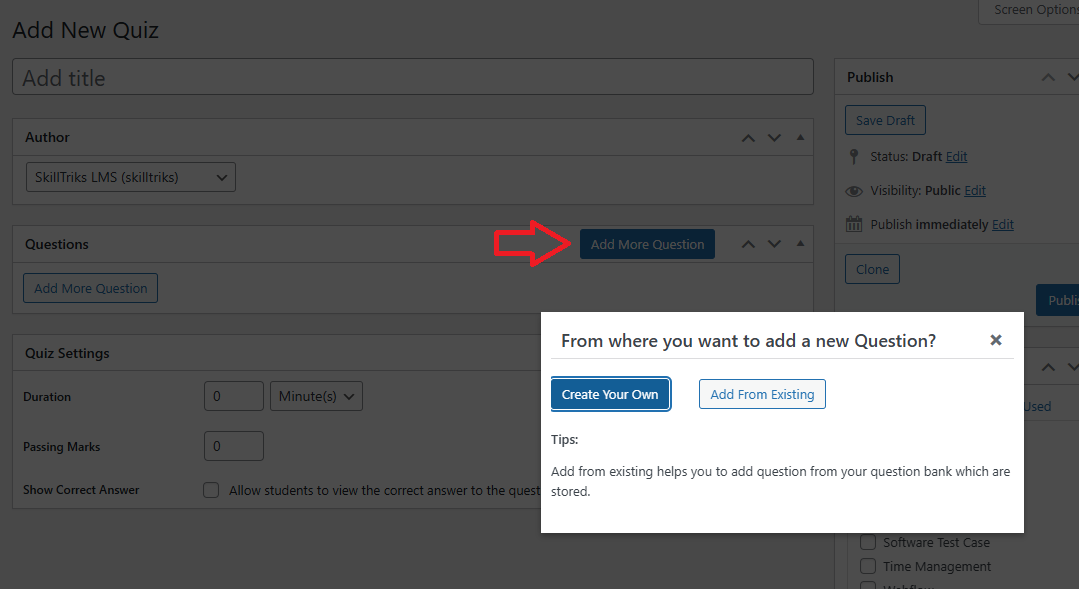
Option 1: Create your own questions
- Click on the Add More Question button
- Click on the Create your own question button
The user can add their own question directly into the quiz, just like they do in the question modules.
You can choose from four types of questions in the drop-down: True/False, Single-Choice, Multiple-Choice, and Fill in the Blanks.
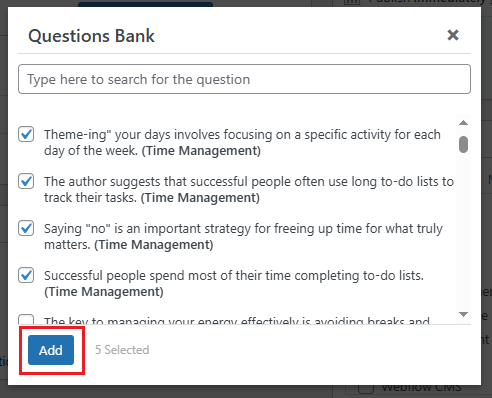
Option 2: Choose from existing questions
- Click on the Add More Question button
- Click on the add from existing question button
All the published questions will appear in this list. You can add as many questions as you like to the quiz by selecting them and clicking the “Add” button.
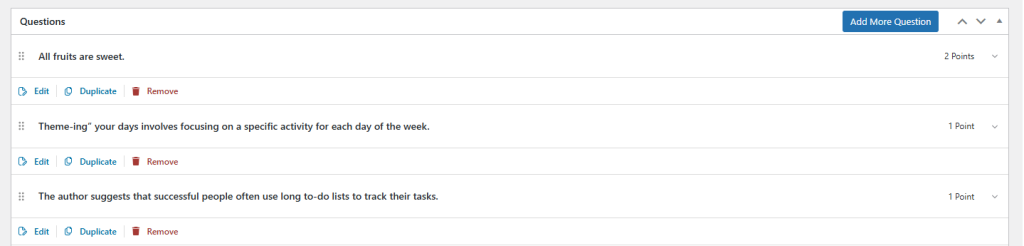
Other actions in the questions section
- Edit: Allows you to modify the existing question.
- Duplicate: Creates a copy of the current question.
- Remove: Deletes the question from the list.
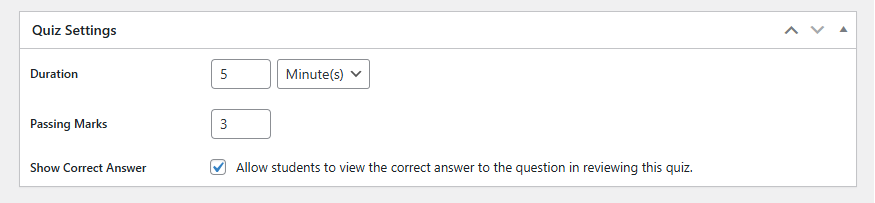
Quiz Settings Section
- Duration: Sets the time limit for completing the quiz.
- Passing Marks: Defines the minimum score required to pass the quiz.
- Show Correct Answer: Enables learner to see the correct answers after submitting the quiz.
Note: If Quiz Setting is turned off, you won’t see the answer explanation.
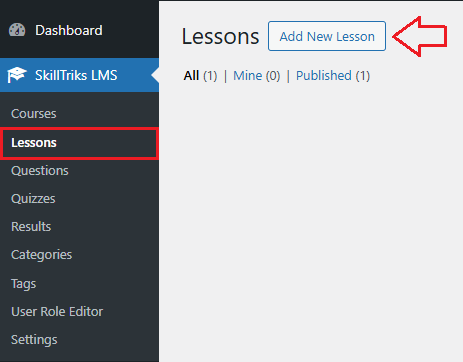
How do I create a new lesson?
- Click on the SkillTriks LMS Plugins.
- Click on the Lessons menu, then click the Add New Lesson button.
- Now you can see different sections here, with a description below each one.
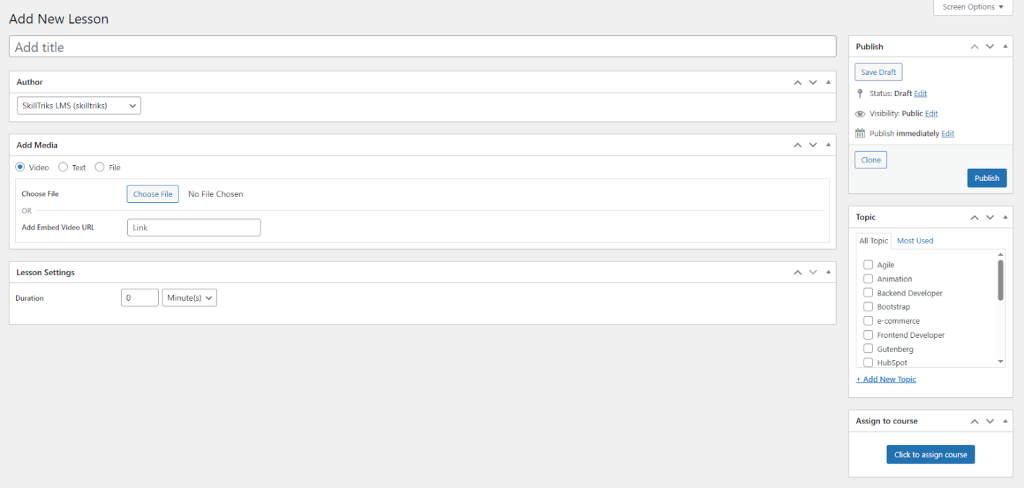
- Add Media: Choose the type of content (video, text, or file) for the lesson.
- Topic: Categorize the lesson under specific subjects or tags.
- + Add New Topic: Create a new topic category for the lesson.
- Duration (in Lesson Settings): Sets the time limit for completing the lesson.
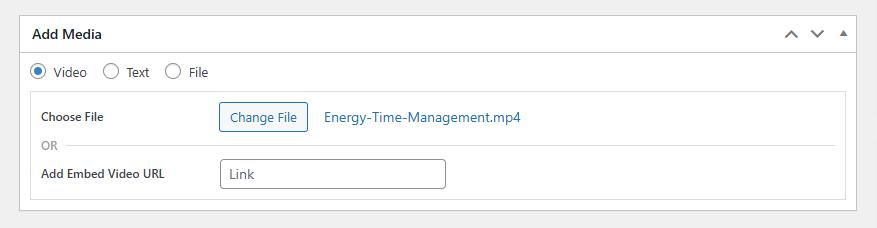
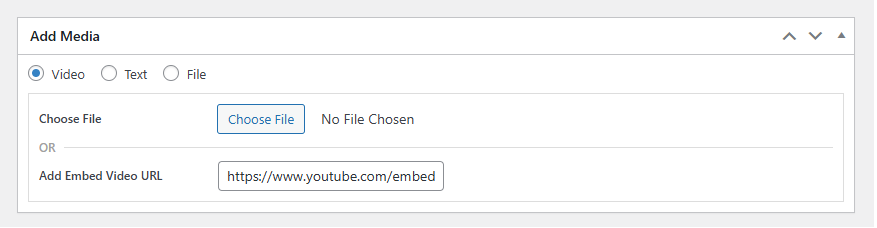
How can I create a video lesson?
Option 1: Upload a video from your computer.
The user can upload a video from his computer.
- Click on the change file button.
Option 2: Add Embed Video URL
The user can paste a video link (e.g., YouTube) to embed in the lesson.
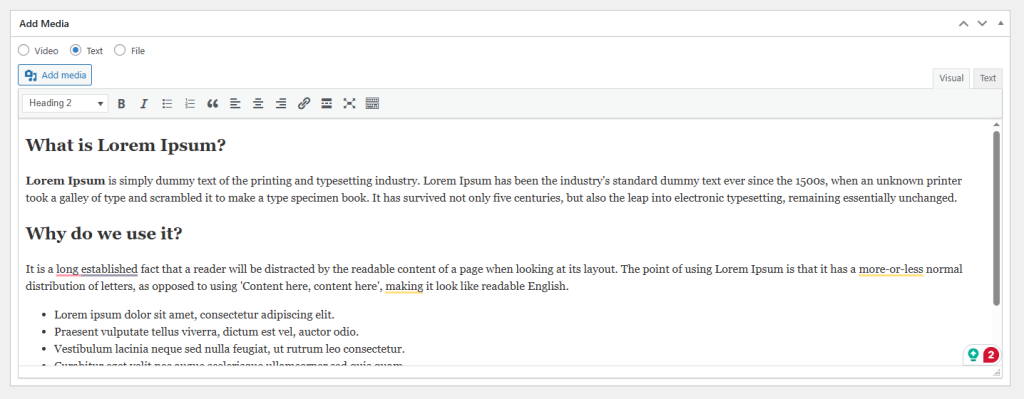
How can I create a text lesson?
Text content type allows you to create lessons using written material directly within the editor. It’s ideal for adding formatted text, images, and links without uploading separate files.
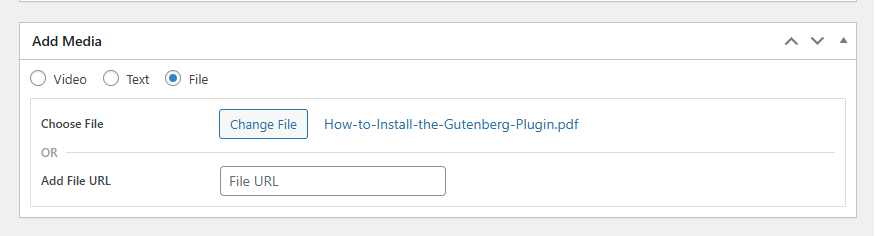
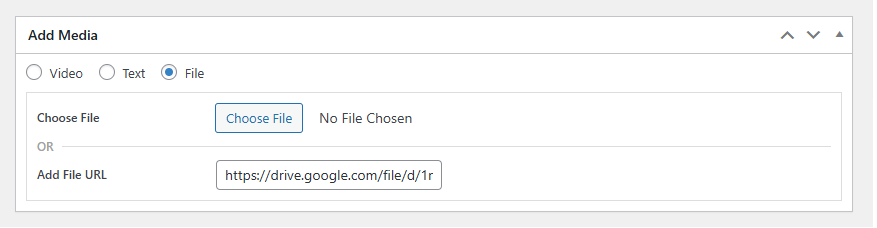
How can I create a file lesson?
Option 1: Upload a PDF file from your computer.
The user can upload a PDF file from his computer.
- Click on the change file button.
Option 2: Add File URL
The user can paste a Google drive URL in the lesson.
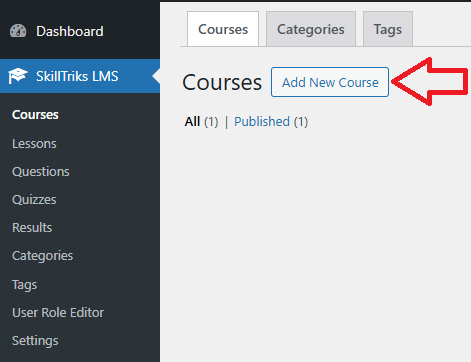
How do I create new courses?
- Click on the SkillTriks LMS Plugins.
- Click on the courses menu, then click the Add New Course button.
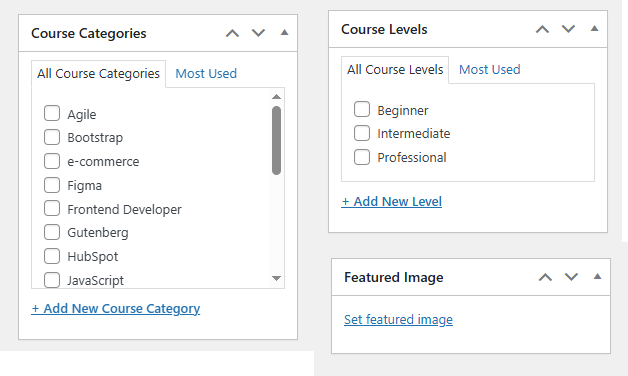
Add New Courses: Section on the Right Side
- Course Categories: Classify courses into specific topics or subjects to help users find easier filtering and navigation.
- Course Levels: Define the difficulty or experience level of the course (e.g., Beginner, Intermediate, Professional).
- Featured Image: Set a main image that visually represents the course on listings and pages.
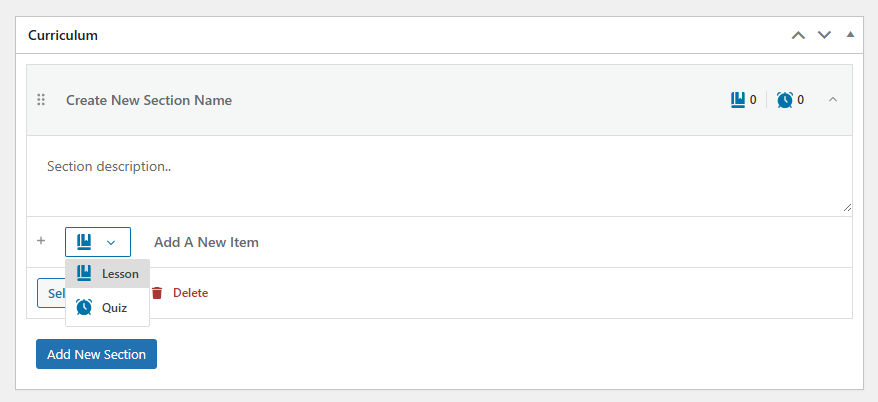
Add New Courses: Section on the Curriculum
- Create New Section Name: Enter the title of a curriculum section (e.g., Welcome To The Course).
- Section description: Add a brief overview of what the section covers.
- Add A New Item: Insert new content like a lesson or quiz into the section.
- Quiz: Add an assessment to test the learner on the section content.
- Lesson: A content unit used to deliver instructional material such as videos, text, or files within a course.
- Delete: Remove the section and its items from the curriculum.
- Add New Section: Create another section to expand the curriculum structure.
We are creating a course with 2 sections, and we’ve added lessons and quizzes throughout it.
- Curriculum Section 1
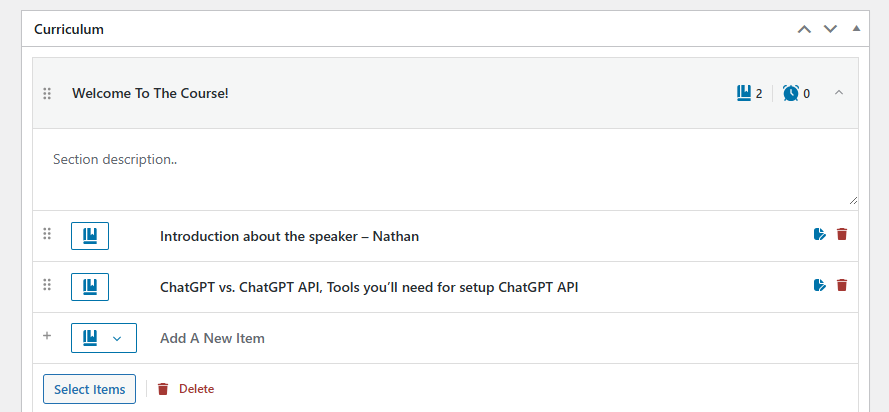
- Curriculum Section 2
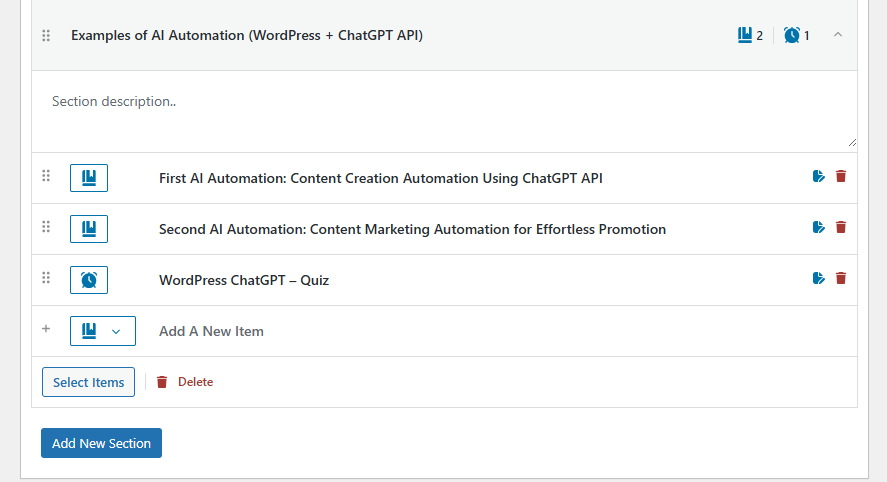
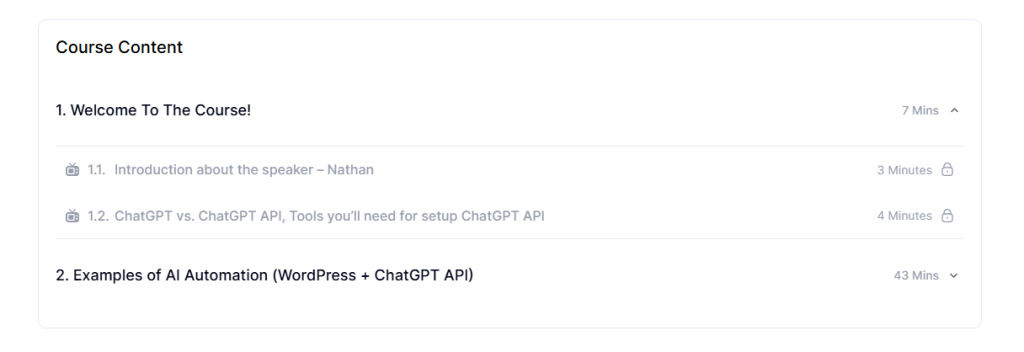
The user will see both curriculum sections like this on the front end.
Add New Courses: Course Settings
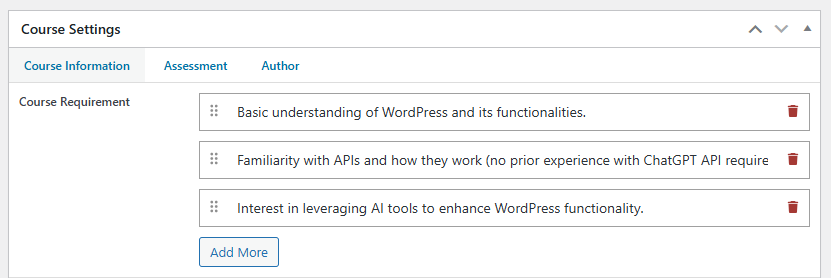
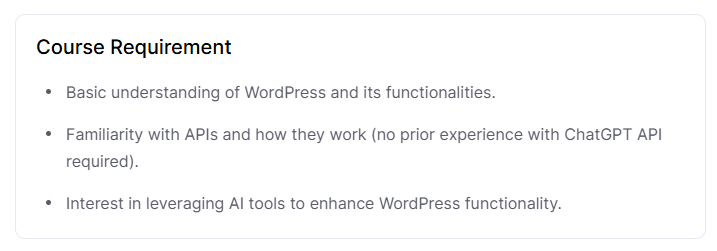
Course Information: Course Requirement
Add what learners need before starting the course (e.g., prior knowledge or tools).
Course Requirement: Admin Side
Course Requirement: Frontend Side
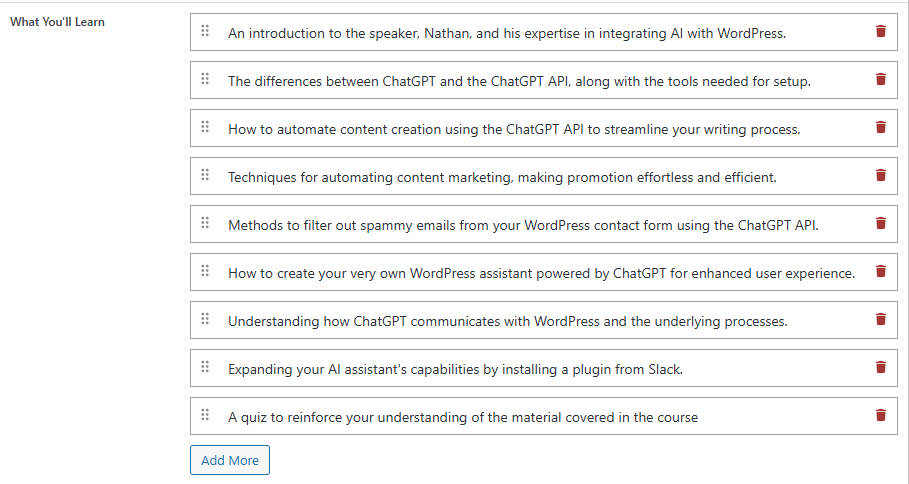
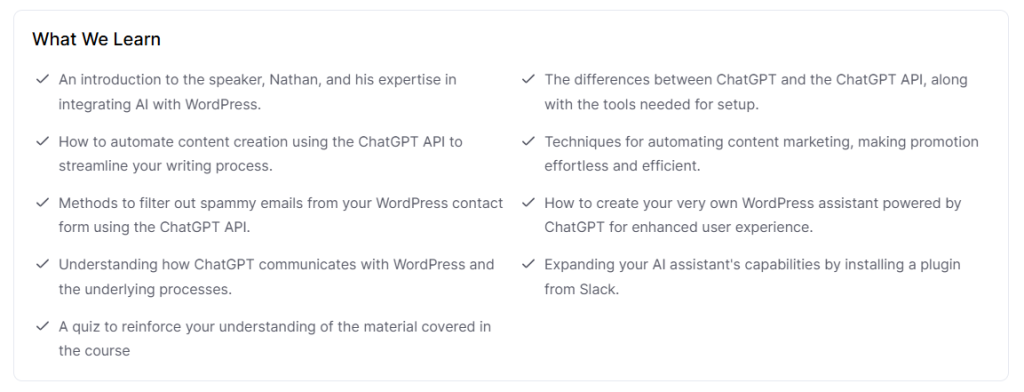
Course Information: What You’ll Learn
List the key things learners will learn by the end of the course
Course Requirement: Admin Side
Course Requirement: Frontend Side
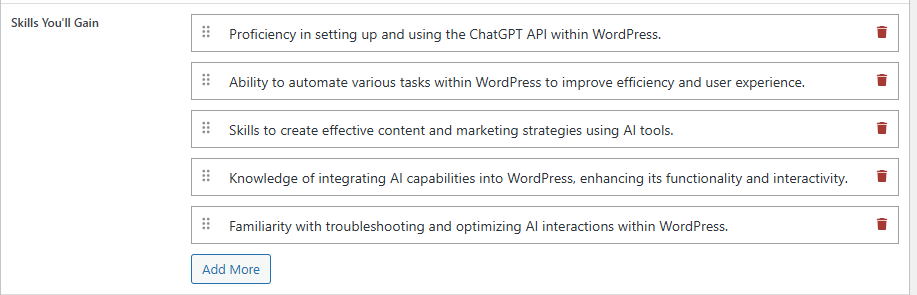
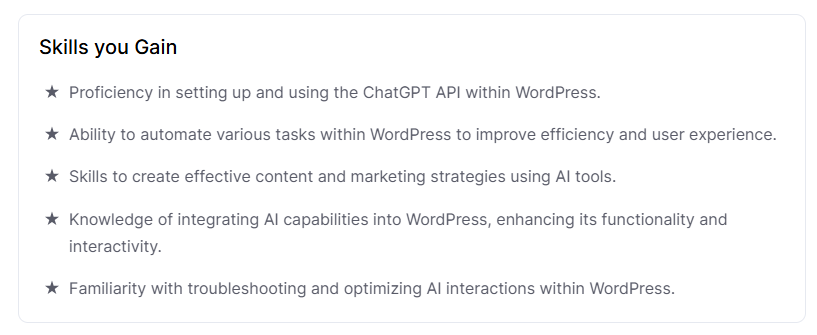
Course Information: Skills You Gain
Specify the specific abilities learners will develop throughout the course.
Course Requirement: Admin Side
Course Requirement: Frontend Side
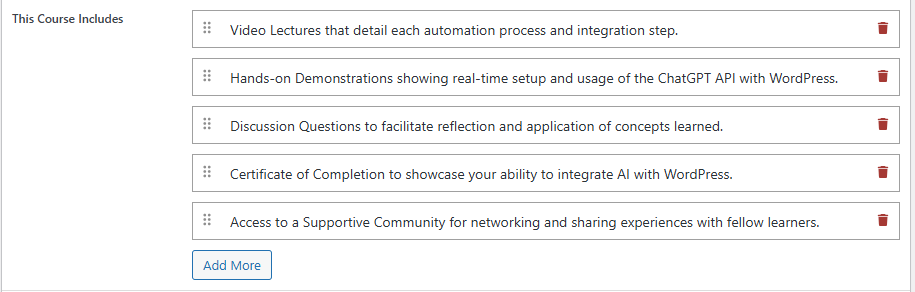
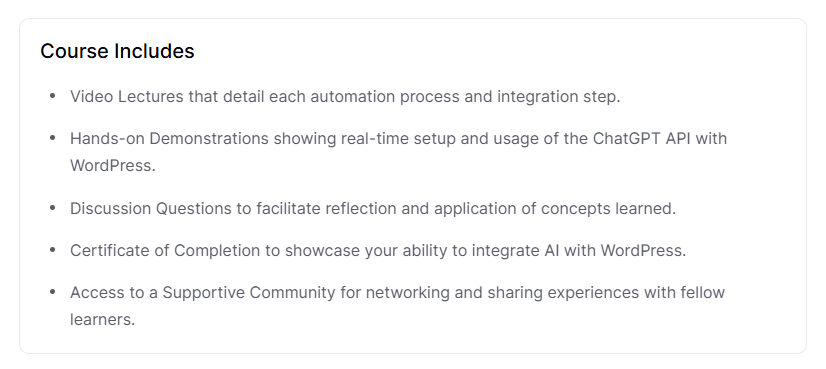
Course Information: This Course Includes
Show what’s provided with the course, like videos, files, and certifications.
Course Requirement: Admin Side
Course Requirement: Frontend Side
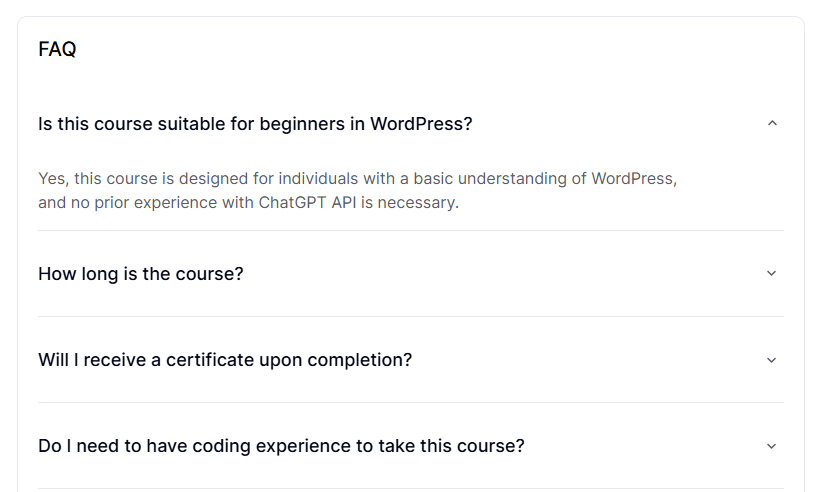
Course Information: FAQs
Add common questions and answers about the course to help learners.
Course Requirement: Admin Side
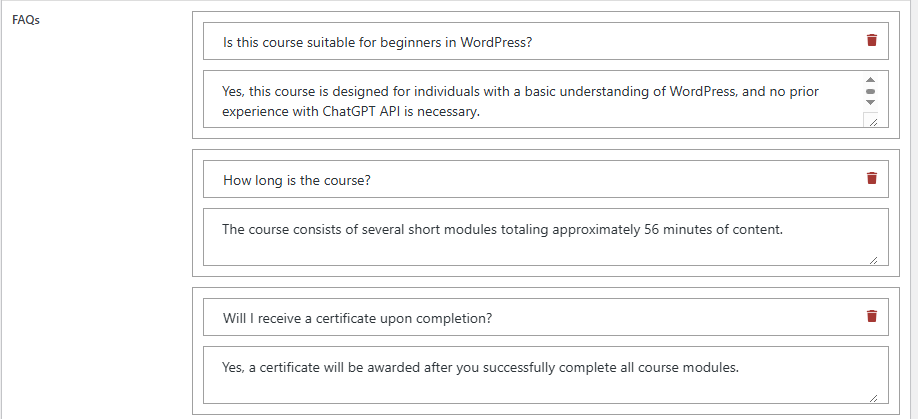
Course Requirement: Frontend Side
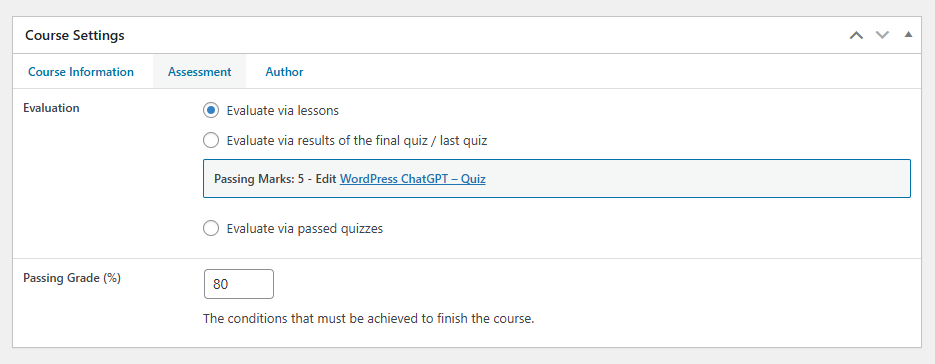
Course Settings: Assessment
Evaluation: Determine how learners will be assessed—either through lessons or quizzes. Example: Use quizzes or lesson completion to track progress.
- Evaluate via lessons: To pass the course, learners just need to finish all the lessons. There’s no quiz required. (If there is no quiz in a course)
- Evaluate via results of the final quiz/last quiz: The learner must take and pass the final/last quiz to complete the course. This method checks overall understanding at the end.
- Evaluate via passed quizzes: Learners must pass all quizzes in the course to complete it. Completion depends on quiz performance, not just viewing lessons.
- Passing Grade (%): Set the minimum score needed to pass the course (e.g., 80%). If the student scores below this, they won’t complete the course.
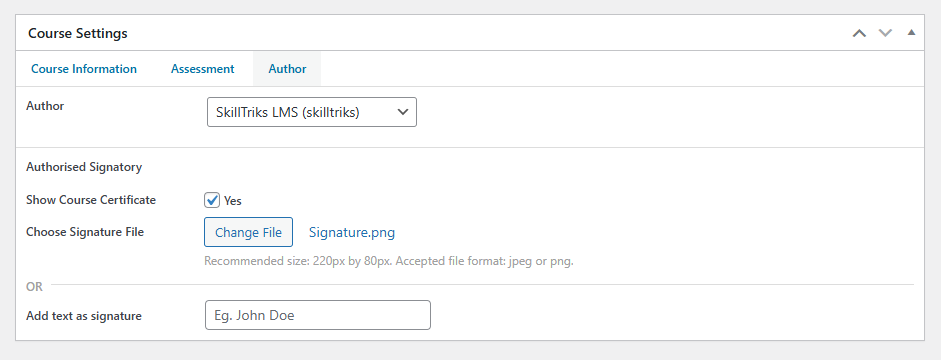
Course Settings: Author/Certificate
- Author: The person or organization who created or published the course.
- Authorised Signatory: The official person whose name or signature will appear on the course certificate. This makes the certificate valid and trustworthy.
- Show Course Certificate: Tick this option to give learners a certificate after completing the course. If checked, a certificate will be downloadable.
- Choose Signature File: Upload a digital signature image (JPEG or PNG) to appear on the certificate. It gives an official look to the certificate.
- Add text as a signature: If you don’t have an image, you can type the signatory’s name here. The typed name will be used as a signature on the certificate.
User Role Editor
A role is a set of permissions that decides what tasks an admin can do. In WordPress, roles help the site owner control what users are allowed or not allowed to do in the SkillTriks LMS.
WordPress has five default roles: Administrator, Editor, Author, Contributor, and Subscriber. Each role can do certain actions, which are called capabilities in WordPress. Capabilities are the same as permissions or user rights.
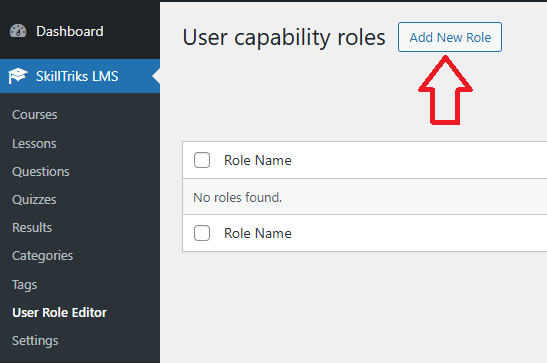
How do I create a new user role?
- Click on the SkillTriks LMS Plugins.
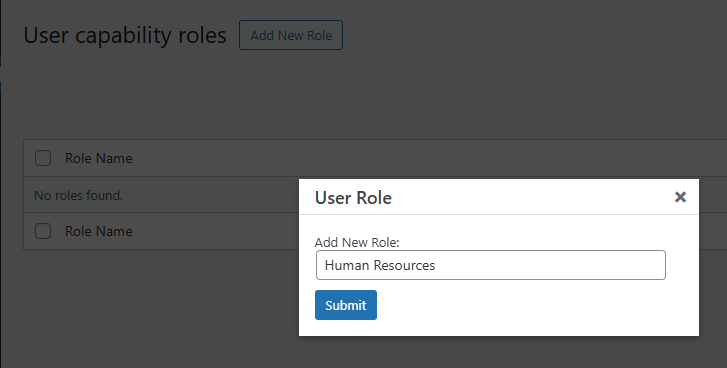
- Click on the User Role Editor menu, then click the Add New Role button.
- Type the user role name in the input field.
- Click on the submit button
The user permissions window is open.
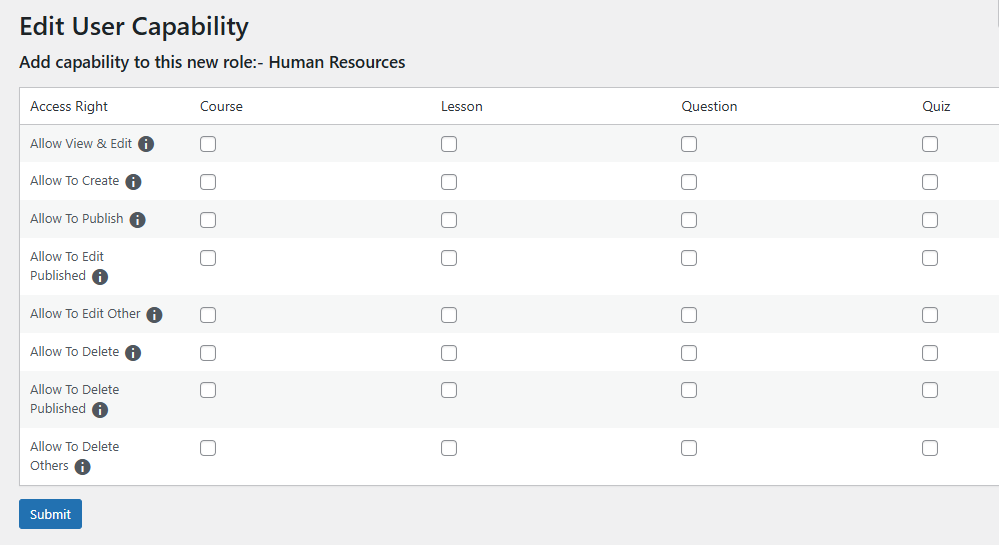
Here is a simple explanation of each access right.
- Allow View & Edit: The user see and makes changes to existing courses.
- Allow to Create: Gives the user permission to make and add new courses. They can build courses from scratch.
- Allow to Publish: Lets the user publish courses so they’re visible to others. Without this, they can only save drafts.
- Allow to Edit Published: You can edit your own published courses. This is handy for fixing mistakes or making updates.
- Allow to Edit Other: Gives the user permission to edit courses created by other users.
- Allow to Delete: The user can delete their own courses.
- Allow to Delete Published: Allows deletion of courses that have already been published. (own published courses)
- Allow to Delete Others: The user can delete courses created by other users. (draft)
- Allow to Delete + Allow to Delete Published + Allow to Delete Others: You can delete courses that other users have created, even if those courses are already published. This is a very strong permission.
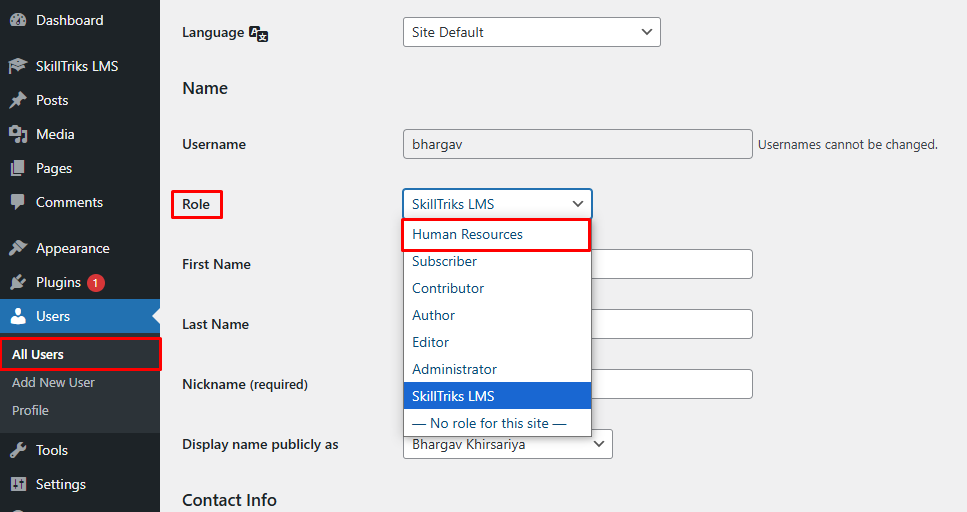
How do I assign user roles to the user?
- Go to All Users
- Edit the user’s profile.
- Choose a role from the role drop-down menu. (This list shows all available roles, and you can pick the one that gives the user the permissions you want.)