Table of Contents
ToggleSystem Requirements
- PHP: 7.x+ for SkillTriks LMS
- Database: MySQL 5.8 or later
- WordPress version: 6.0 or higher
- Browser: Google Chrome, Firefox, Safari, Microsoft Edge
Recommended Server & Video Settings:
- You should have at least 2 GB RAM.
- Keep 30 GB storage or more, depending on how many videos you have.
- Use videos in MP4 format.
- Recommended each video lesson should be up to 200 MB.
- Use Cloudflare CDN to make videos load and play faster.
- If a video is larger than 500 MB, store and deliver it using AWS S3 or CloudFront.
Installation
You can install SkillTriks just like any other WordPress plugin. For more help, pick one of the methods below.
Installing the SkillTriks LMS is simple. You can find it in the WordPress.org plugin directory or install it directly from your WordPress dashboard.
From the Admin Dashboard:
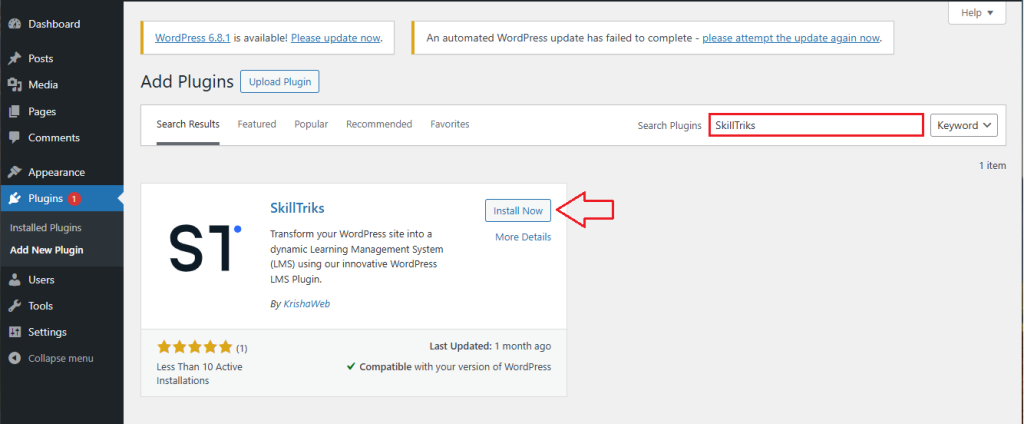
- Go to your WordPress Dashboard.
- Click on Plugins, and then Add New Plugin, and in the search box, type SkillTriks
- Find SkillTriks LMS in the results and click the Install button
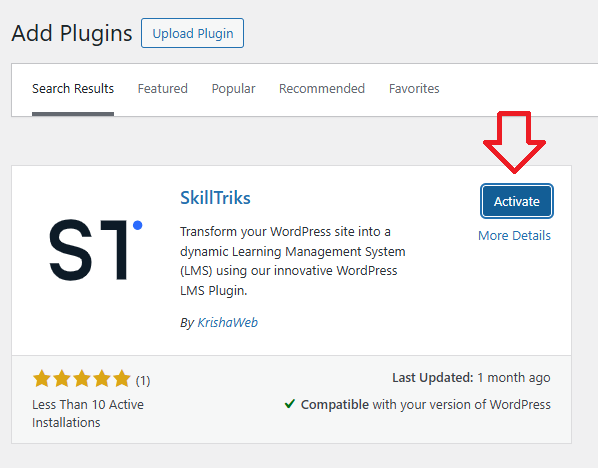
Once it’s installed, click on the Activate button to start using the plugin
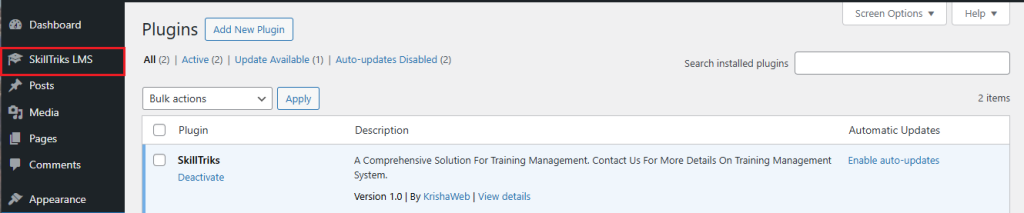
Once the plugin is installed, you’ll see its name on the left-side menu. You can now start using it.
Manually
- Upload the SkillTriks folder to the /wp-content/plugins/ directory.
- Then, go to the ‘Plugins’ menu in WordPress and activate the plugin.
Permalink Settings
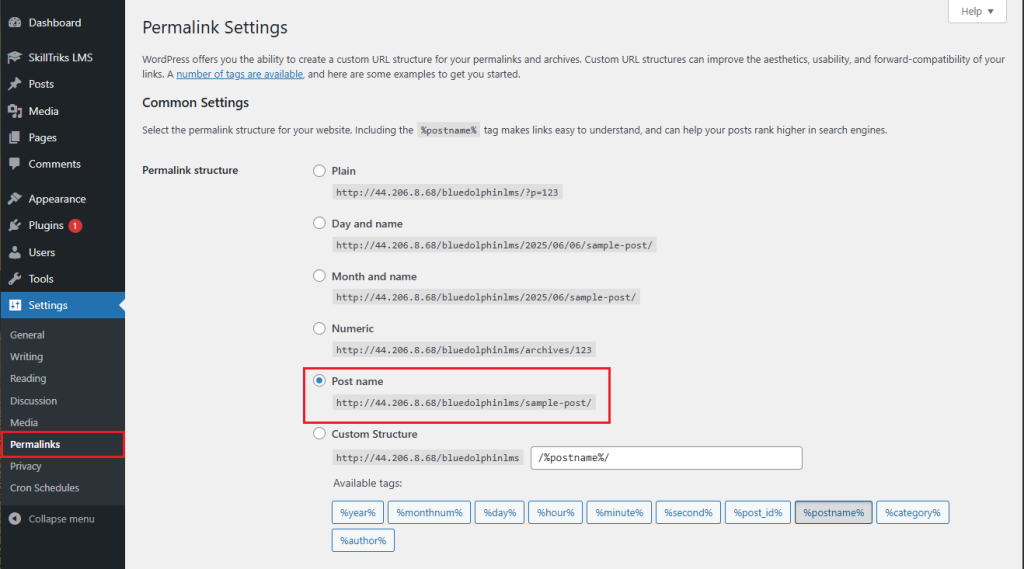
A permalink is the custom URL format for your website. SkillTriks needs the Post Name option to work properly because it uses that format for the dashboard and other links.
- To set it up, go to your WordPress Dashboard > Settings > Permalinks.
If you choose anything other than “Post Name,” you might see 404 errors on your site.
Introduction
Now, if you click on SkillTriks LMS in the left menu, you’ll see four submenu options. Here’s a brief introduction to each one:
- Questions: The user can add various types of questions here, including True/False, Single Choice, Multiple Choice, and Fill in the Blank.
- Quizzes: A collection of questions organized together to check how well learners have understood the lesson topics.
- Lessons: Small parts of a course that teach one topic at a time, typically featuring videos, text, or files.
- Courses: A full learning course with lessons and quizzes that teach a subject from beginning to end.
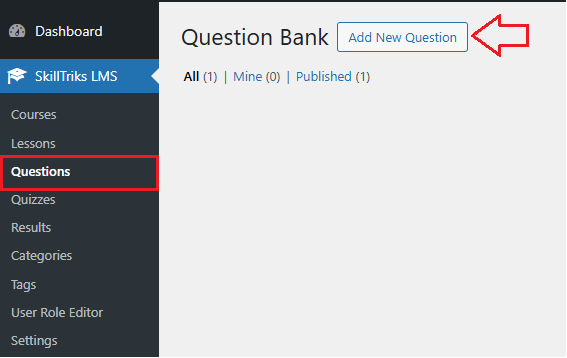
How do I create a new question?
- Click on the SkillTriks LMS Plugins.
- Click on the Questions menu, then click the Add New Question button.
- Now you can see different sections here, with a description below each one.
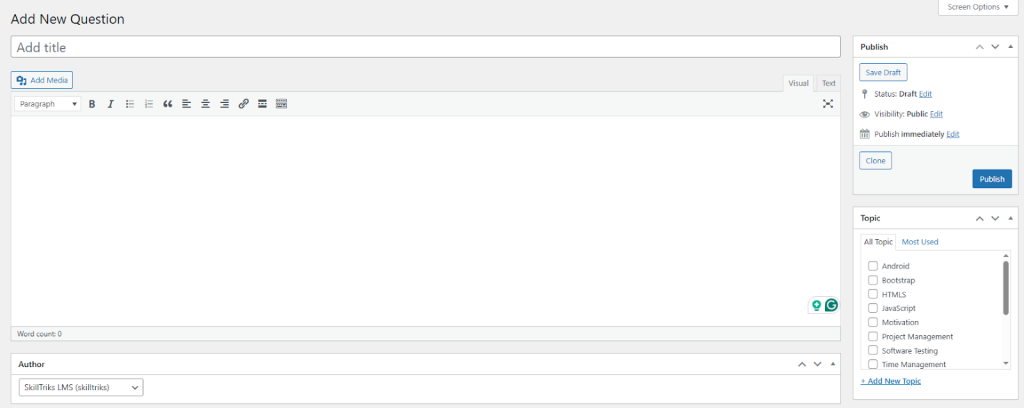
- Add title: Type the title of your question here.
- Save Draft: Click this to save your work without publishing it. You can edit it later.
- Clone: Makes a copy of this question.
- Publish: Makes your question live so others can see it.
- Add New Topic: Click this to create a new topic (category) for your question.
- Topic list: Choose from existing topics to organize your question.
SkillTriks LMS allows you to add four different types of questions. They are:
- True/False
- Single Choice
- Multiple Choice
- Fill in the Blanks
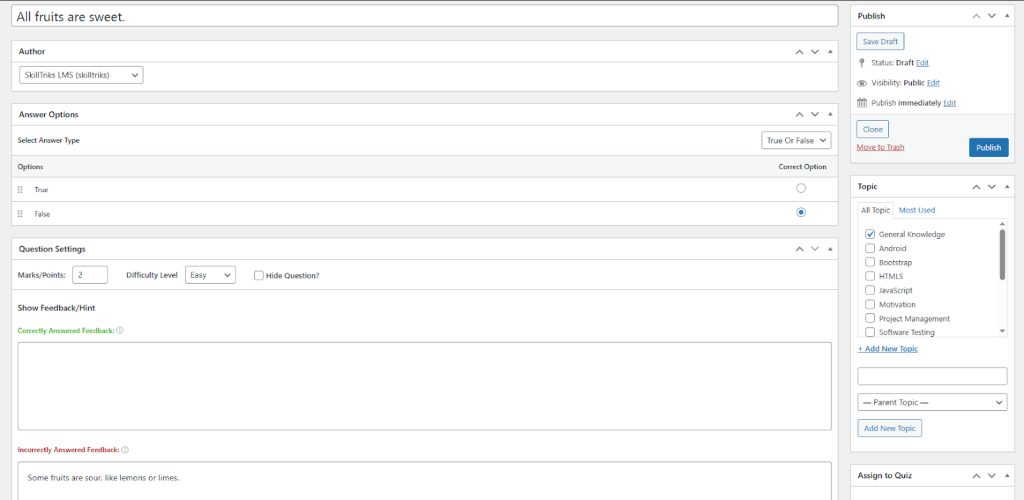
How can I create a True/False question?
The True/False question type lets you make easy questions where learners pick either True or False. To add a True/False question, go to the answer options and choose the True/False type.

Later, you’ll get the question setting section.
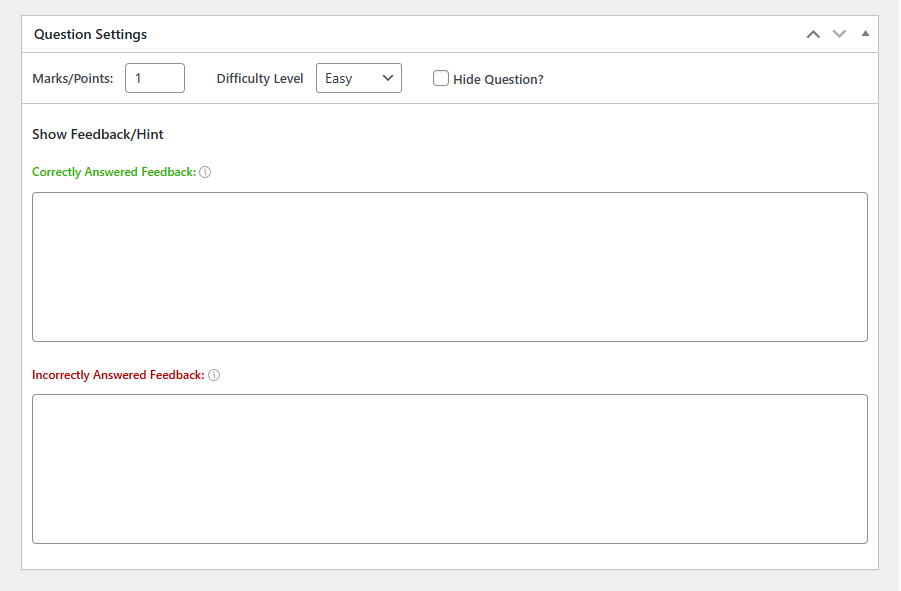
- Marks/Points: Enter how many points the question is worth.
- Difficulty Level: Choose how hard the question is (Easy, Medium, Hard).
- Hide Question?: Tick this if you want to hide the question from users.
- Correctly Answered Feedback: Write a message to show when the user answers correctly.
- Incorrectly Answered Feedback: Write a message to show when the user answers incorrectly.
Note: If Quiz Setting is turned off, you won’t see the answer explanation.
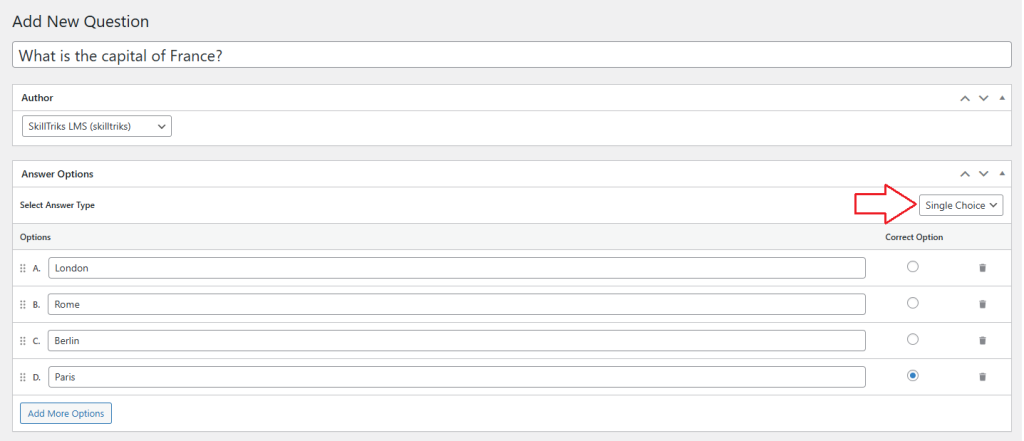
How can I create a single-choice question?
A single-choice question asks learners to pick one answer from many options. Only one answer is correct. To add a single-choice question, go to the answer options and choose the single-choice type.
- Add More Options: Click this button to add extra answer choices to the question.
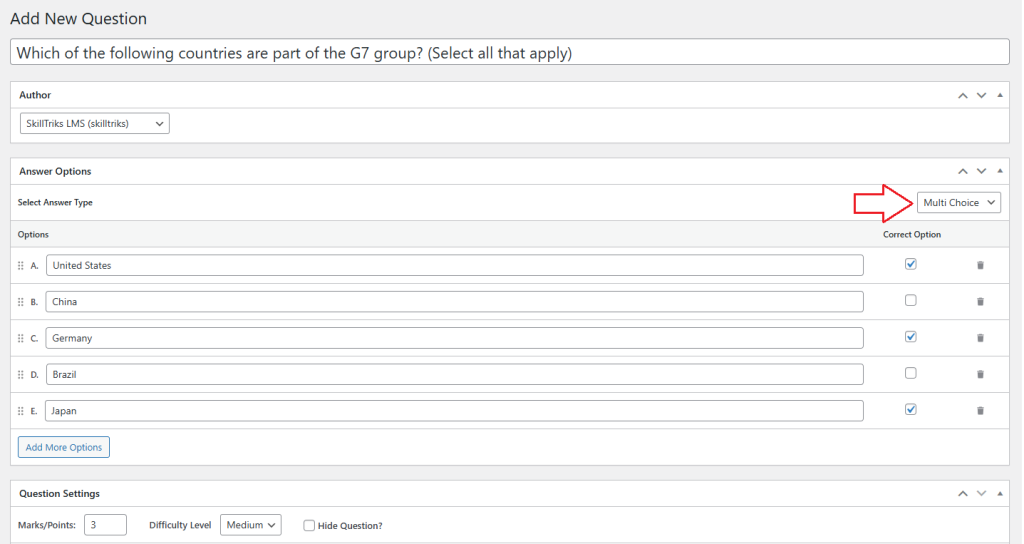
How can I create a multiple-choice question?
A multiple-choice question lets learners pick more than one correct answer from a list. It checks if they know all the right options. To add a multiple-choice question, go to the answer options and choose the multiple-choice type.
- Add More Options: Click this button to add extra answer choices to the question.
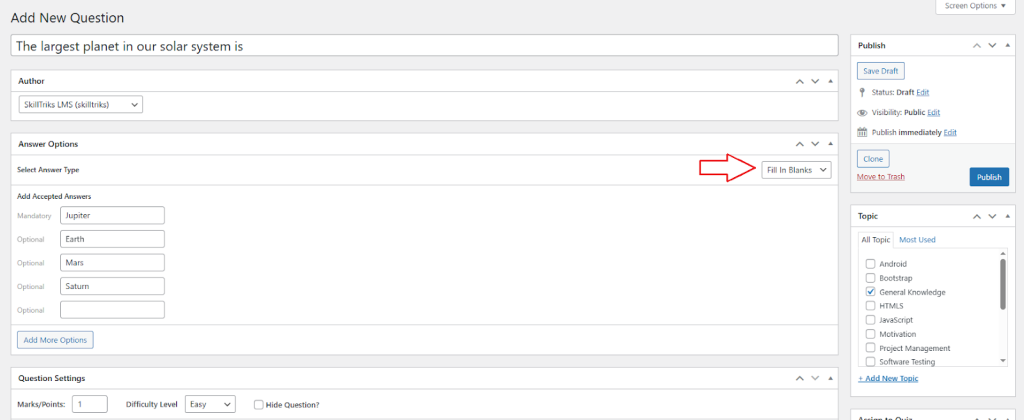
How can I create a fill-in-the-blank question?
In a fill-in-the-blank question, the user enters their answer in a text box on the frontend. There is a specific word that must be included in the answer(Mandatory). If the required word is missing, the answer is marked incorrect.
- Add More Options: Click this button to add extra answer choices to the question.
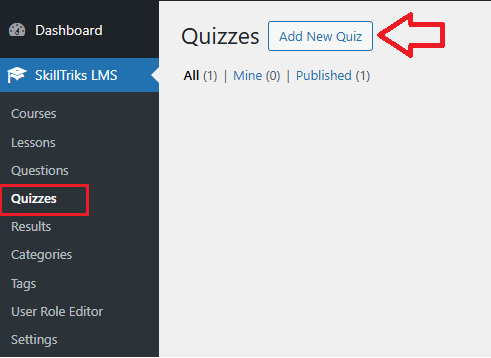
How do I create a new quiz?
- Click on the SkillTriks LMS Plugins.
- Click on the Quizzes menu, then click the Add New Quiz button.
- Now you can see different sections here, with a description below each one.
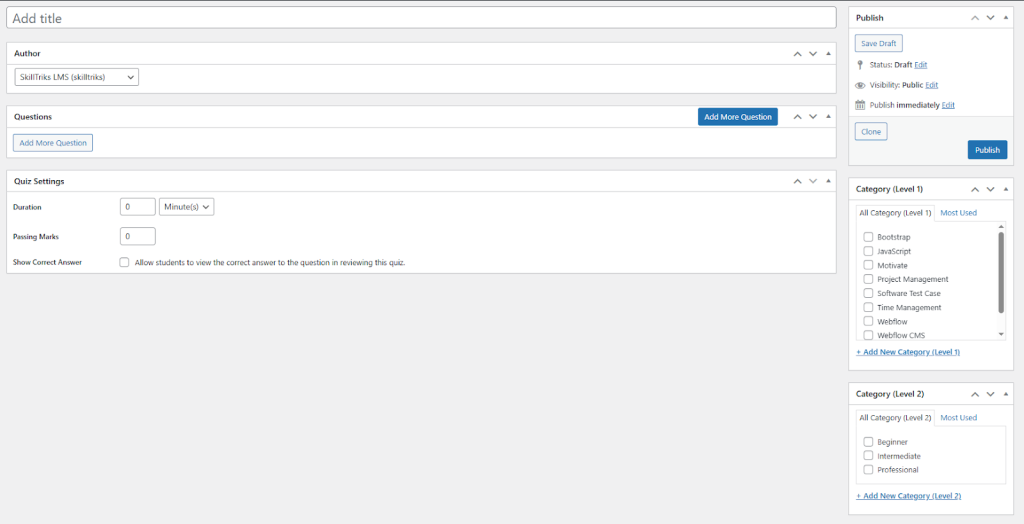
- Category (Level 1): This section allows you to select the primary topic of the quiz, such as JavaScript, Project Management, or Webflow. It helps group quizzes by subject.
- Category (Level 2): This section allows you to select the difficulty level of the quiz, like Beginner, Intermediate, or Professional.
You can think of Level 1 as what the quiz is about, and Level 2 as how hard the quiz is.
You can now add questions to the quiz in two ways:
- Create your own questions
- Choose from existing questions
You will see these two options only when the admin clicks the “Add More Questions” button.
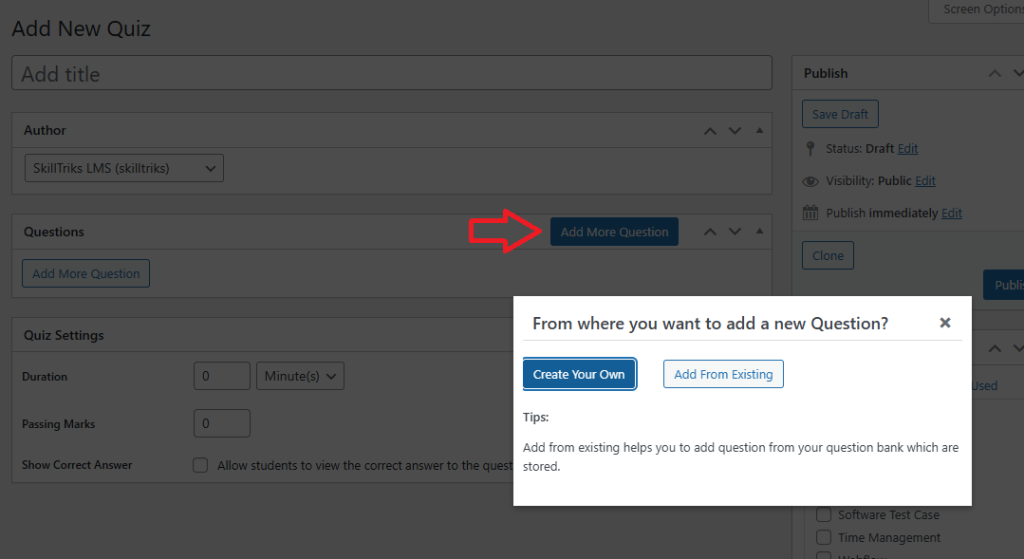
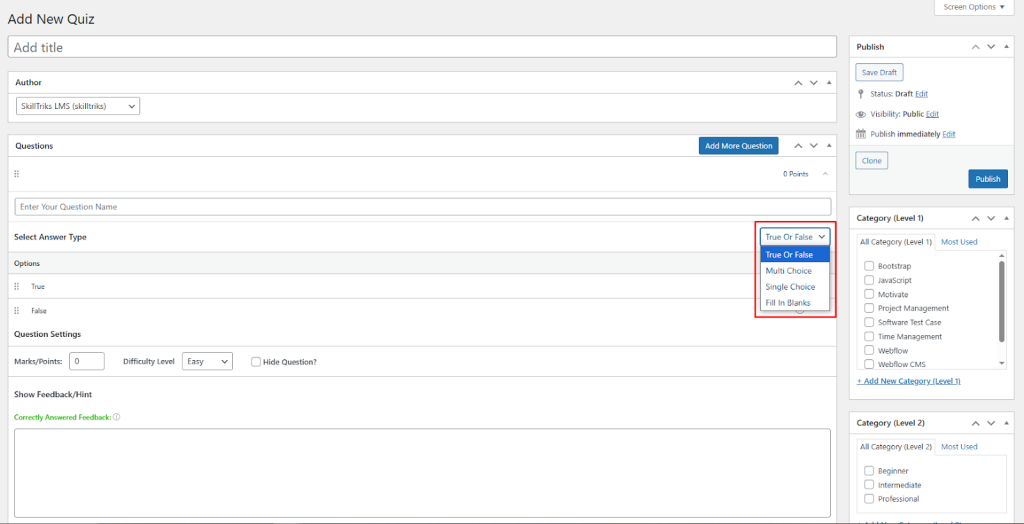
Option 1: Create your own questions
- Click on the Add More Question button
- Click on the Create your own question button
The user can add their own question directly into the quiz, just like they do in the question modules.
You can choose from four types of questions in the drop-down: True/False, Single-Choice, Multiple-Choice, and Fill in the Blanks.
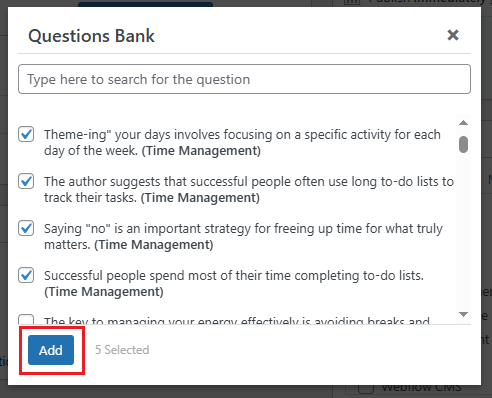
Option 2: Choose from existing questions
- Click on the Add More Question button
- Click on the add from existing question button
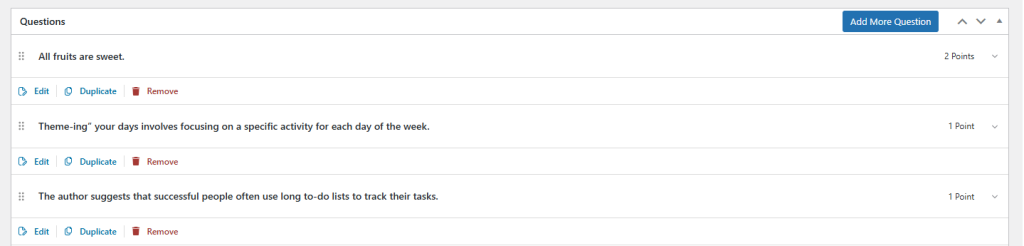
All the published questions will appear in this list. You can add as many questions as you like to the quiz by selecting them and clicking the “Add” button.
Other actions in the questions section
- Edit: Allows you to modify the existing question.
- Duplicate: Creates a copy of the current question.
- Remove: Deletes the question from the list.
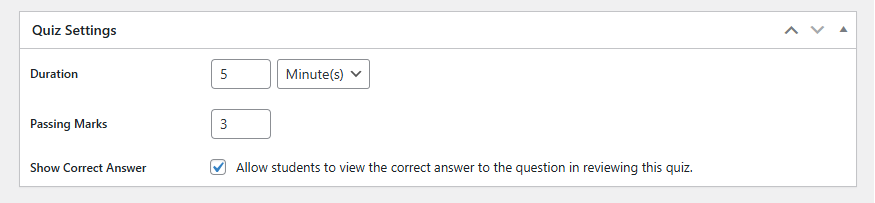
Quiz Settings Section
- Duration: Sets the time limit for completing the quiz.
- Passing Marks: Defines the minimum score required to pass the quiz.
- Show Correct Answer: Enables learner to see the correct answers after submitting the quiz.
Note: If Quiz Setting is turned off, you won’t see the answer explanation.
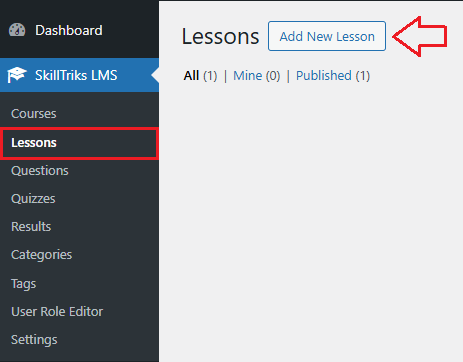
How do I create a new lesson?
- Click on the SkillTriks LMS Plugins.
- Click on the Lessons menu, then click the Add New Lesson button.
- Now you can see different sections here, with a description below each one.
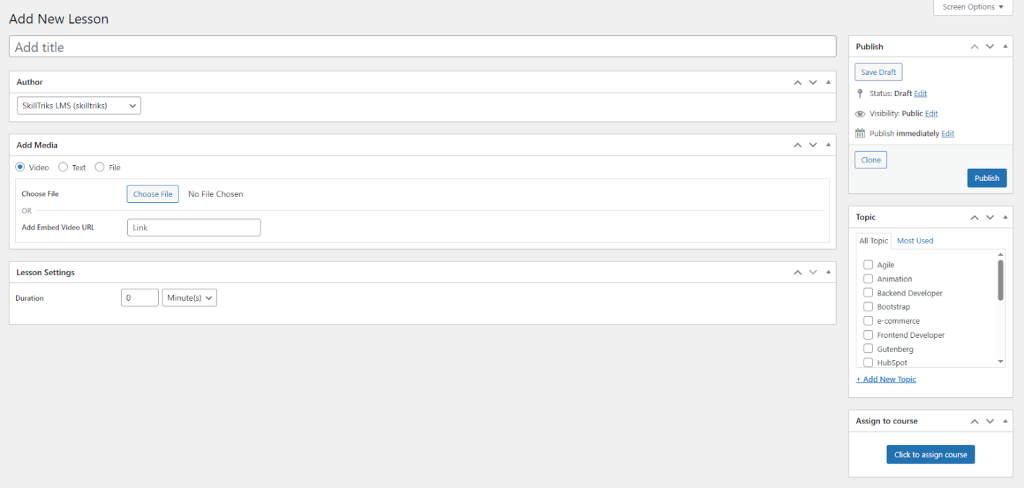
- Add Media: Choose the type of content (video, text, or file) for the lesson.
- Topic: Categorize the lesson under specific subjects or tags.
- Add New Topic: Create a new topic category for the lesson.
- Duration (in Lesson Settings): Sets the time limit for completing the lesson.
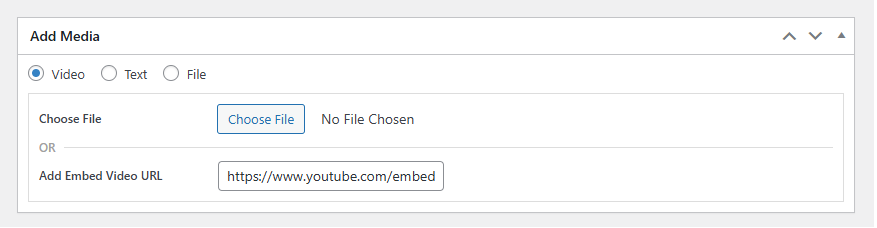
How can I create a video lesson?
Option 1: Upload a video from your computer.
The user can upload a video from his computer.
- Click on the change file button.
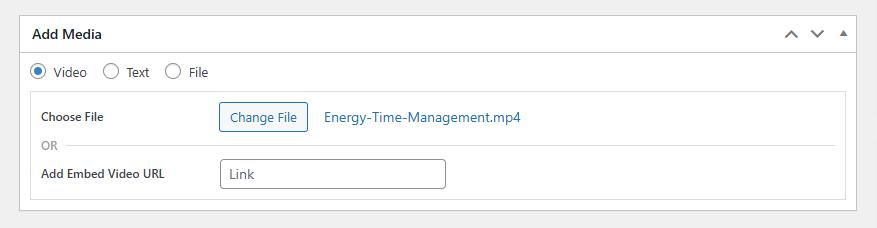
Option 2: Add Embed Video URL
The user can paste a video link (e.g., YouTube) to embed in the lesson.
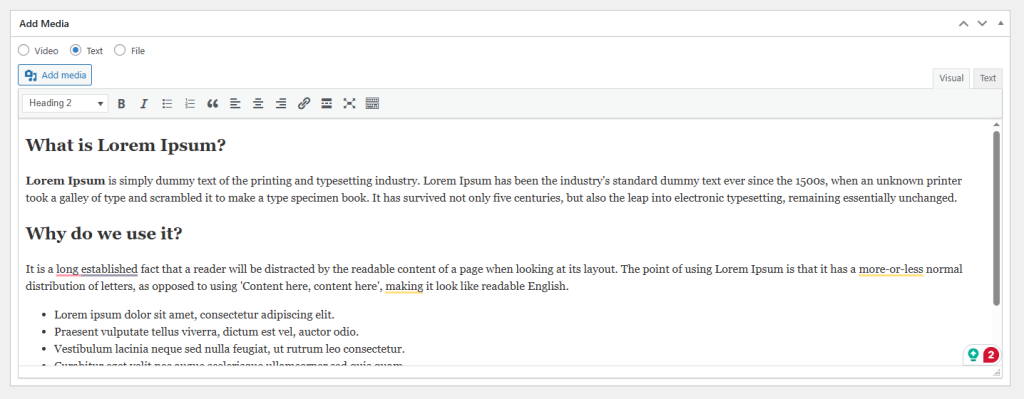
How can I create a text lesson?
Text content type allows you to create lessons using written material directly within the editor. It’s ideal for adding formatted text, images, and links without uploading separate files.
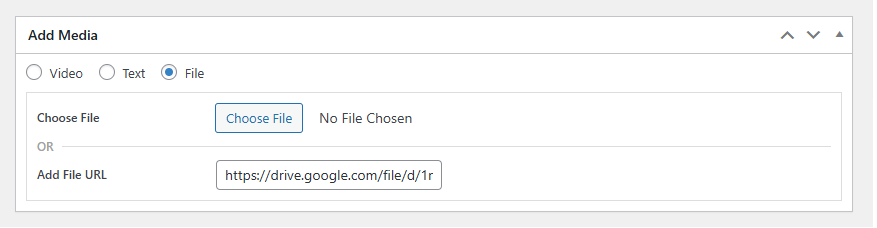
How can I create a file lesson?
Option 1: Upload a PDF file from your computer.
The user can upload a PDF file from his computer.
- Click on the change file button.
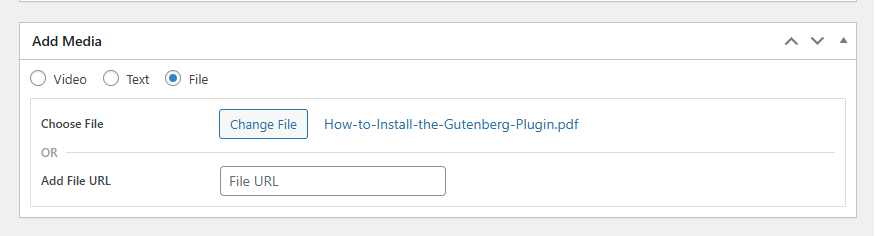
Option 2: Add File URL
The user can paste a Google drive URL in the lesson.
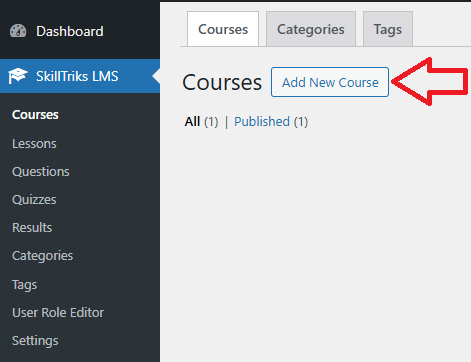
How do I create new courses?
- Click on the SkillTriks LMS Plugins.
- Click on the courses menu, then click the Add New Course button.
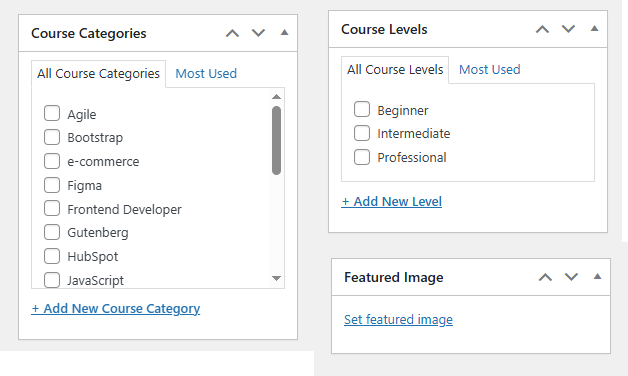
Add New Courses: Section on the Right Side
- Course Categories: Classify courses into specific topics or subjects to help users find easier filtering and navigation.
- Course Levels: Define the difficulty or experience level of the course (e.g., Beginner, Intermediate, Professional).
- Featured Image: Set a main image that visually represents the course on listings and pages.
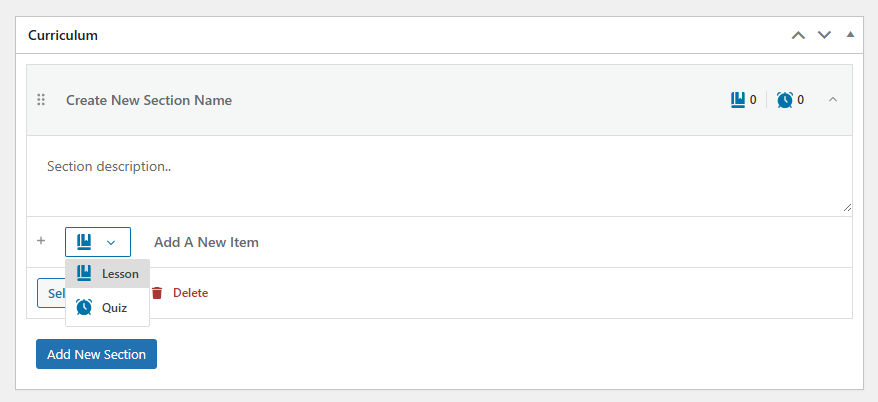
Add New Courses: Section on the Curriculum
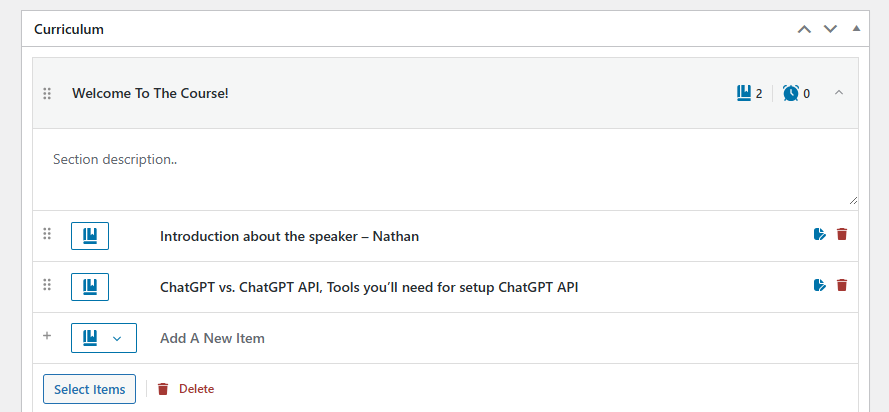
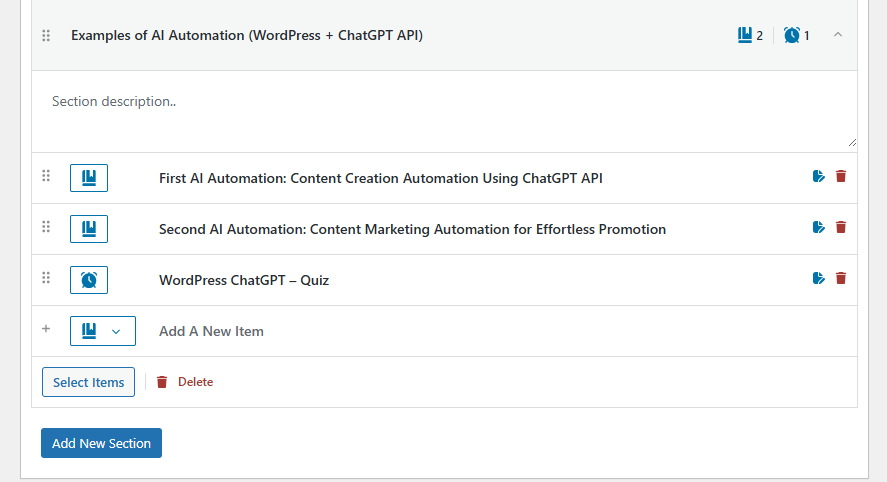
- Create New Section Name: Enter the title of a curriculum section (e.g., Welcome To The Course).
- Section description: Add a brief overview of what the section covers.
- Add A New Item: Insert new content like a lesson or quiz into the section.
- Quiz: Add an assessment to test the learner on the section content.
- Lesson: A content unit used to deliver instructional material such as videos, text, or files within a course.
- Delete: Remove the section and its items from the curriculum.
- Add New Section: Create another section to expand the curriculum structure.
We are creating a course with 2 sections, and we’ve added lessons and quizzes throughout it.
Curriculum Section 1
Curriculum Section 2
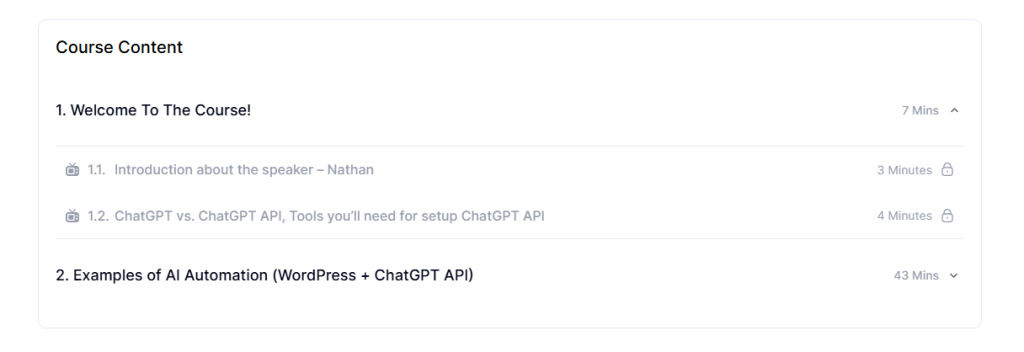
The user will see both curriculum sections like this on the front end.
Add New Courses: Course Settings
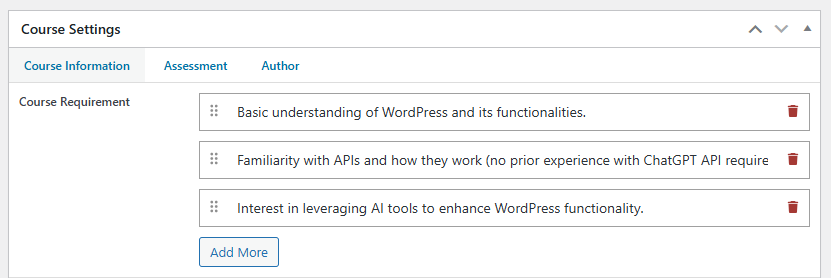
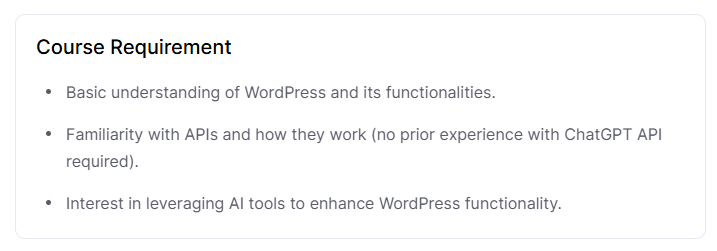
Course Information: Course Requirement
Add what learners need before starting the course (e.g., prior knowledge or tools).
Course Requirement: Admin Side
Course Requirement: Frontend Side
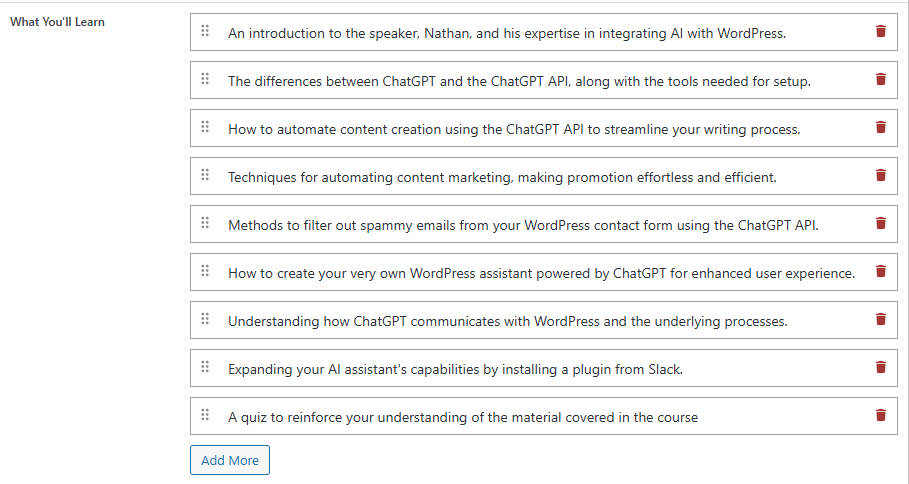
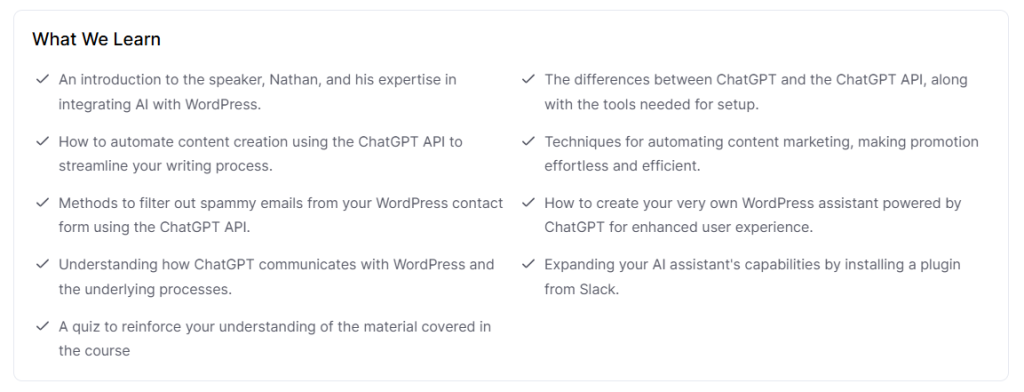
Course Information: What You’ll Learn
List the key things learners will learn by the end of the course
Course Requirement: Admin Side
Course Requirement: Frontend Side
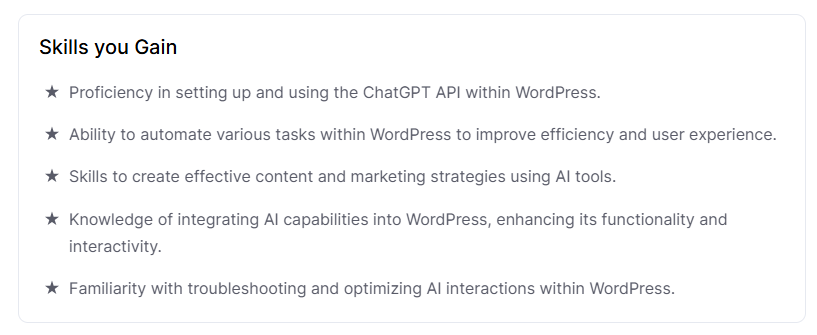
Course Information: Skills You Gain
Specify the specific abilities learners will develop throughout the course.
Course Requirement: Admin Side
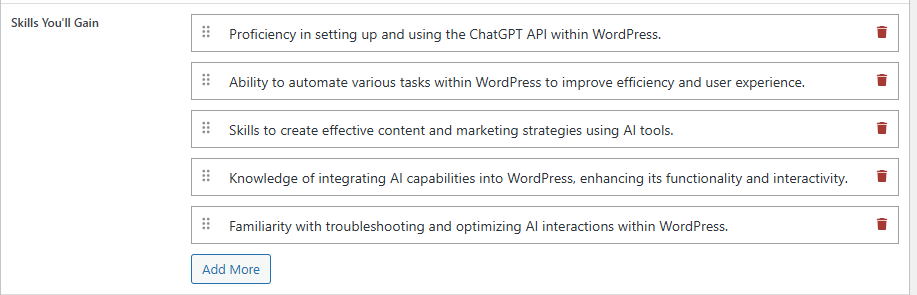
Course Requirement: Frontend Side
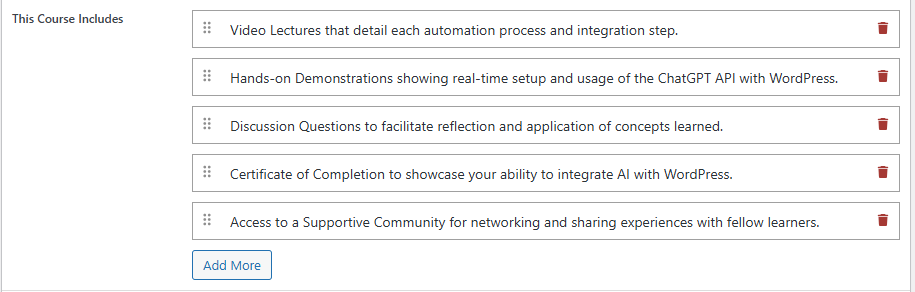
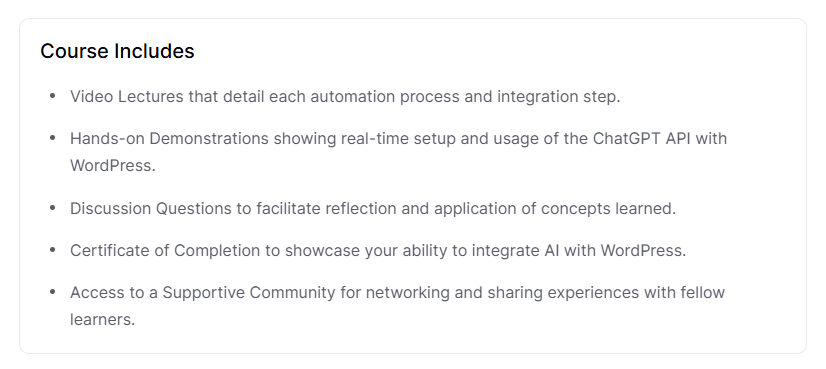
Course Information: This Course Includes
Show what’s provided with the course, like videos, files, and certifications.
Course Requirement: Admin Side
Course Requirement: Frontend Side
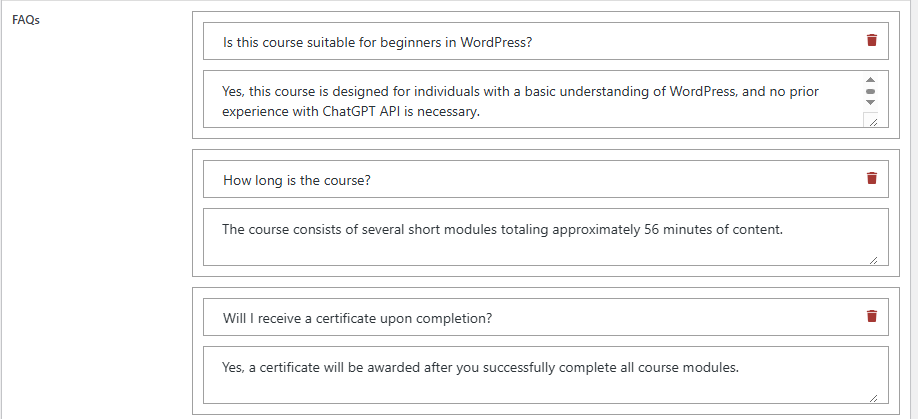
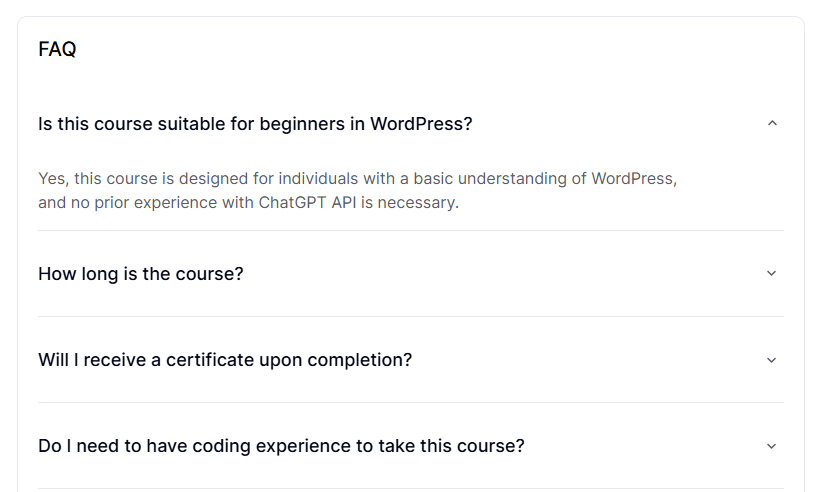
Course Information: FAQs
Add common questions and answers about the course to help learners.
Course Requirement: Admin Side
Course Requirement: Frontend Side
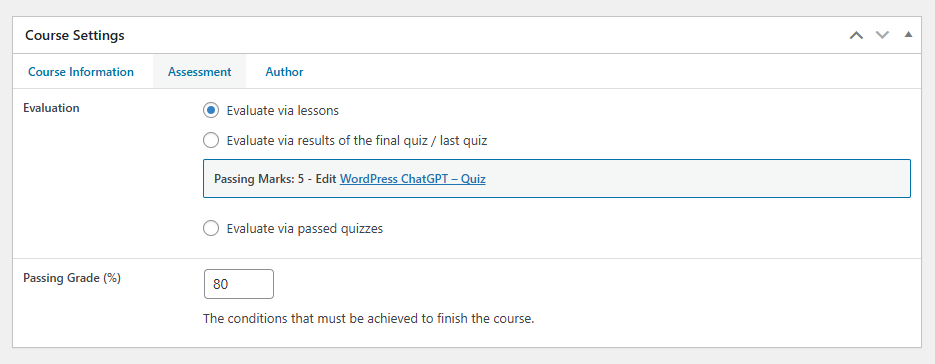
Course Settings: Assessment
Evaluation: Determine how learners will be assessed—either through lessons or quizzes. Example: Use quizzes or lesson completion to track progress.
- Evaluate via lessons: To pass the course, learners just need to finish all the lessons. There’s no quiz required. (If there is no quiz in a course)
- Evaluate via results of the final quiz/last quiz: The learner must take and pass the final/last quiz to complete the course. This method checks overall understanding at the end.
- Evaluate via passed quizzes: Learners must pass all quizzes in the course to complete it. Completion depends on quiz performance, not just viewing lessons.
- Passing Grade (%): Set the minimum score needed to pass the course (e.g., 80%). If the student scores below this, they won’t complete the course.
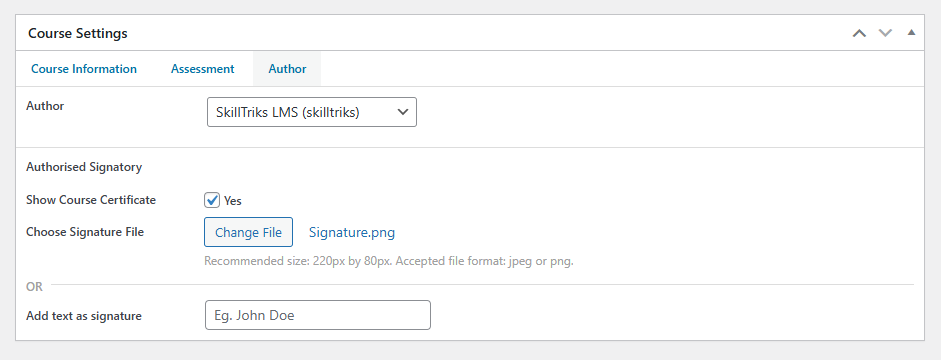
Course Settings: Author/Certificate
- Author: The person or organization who created or published the course.
- Authorised Signatory: The official person whose name or signature will appear on the course certificate. This makes the certificate valid and trustworthy.
- Show Course Certificate: Tick this option to give learners a certificate after completing the course. If checked, a certificate will be downloadable.
- Choose Signature File: Upload a digital signature image (JPEG or PNG) to appear on the certificate. It gives an official look to the certificate.
- Add text as a signature: If you don’t have an image, you can type the signatory’s name here. The typed name will be used as a signature on the certificate.
User Role Editor
A role is a set of permissions that decides what tasks an admin can do. In WordPress, roles help the site owner control what users are allowed or not allowed to do in the SkillTriks LMS.
WordPress has five default roles: Administrator, Editor, Author, Contributor, and Subscriber. Each role can do certain actions, which are called capabilities in WordPress. Capabilities are the same as permissions or user rights.
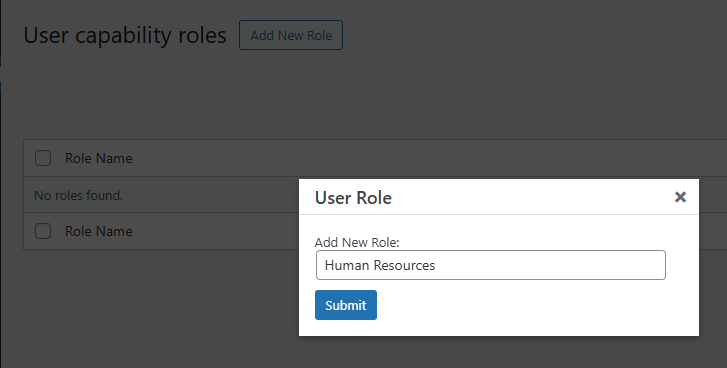
How do I create a new user role?
- Click on the SkillTriks LMS Plugins.
- Click on the User Role Editor menu, then click the Add New Role button.
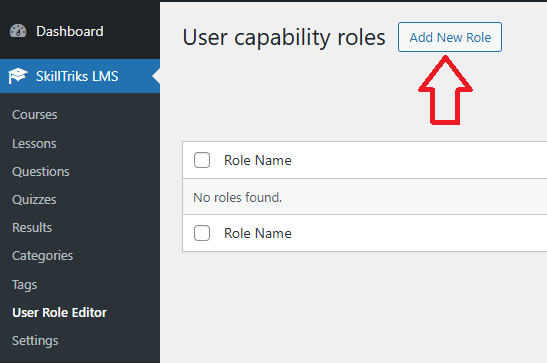
- Type the user role name in the input field.
- Click on the submit button
The user permissions window is open.
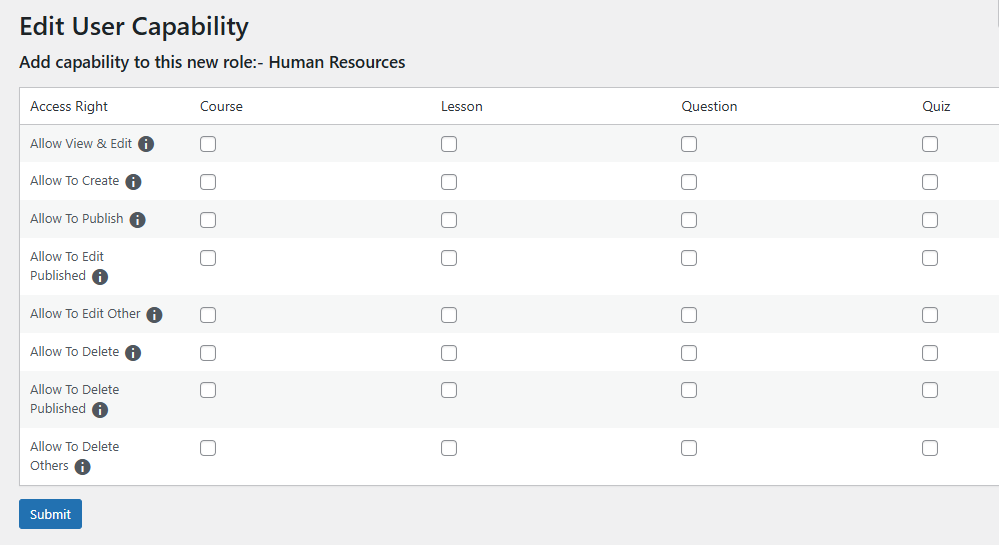
Here is a simple explanation of each access right.
- Allow View & Edit: The user see and makes changes to existing courses.
- Allow to Create: Gives the user permission to make and add new courses. They can build courses from scratch.
- Allow to Publish: Lets the user publish courses so they’re visible to others. Without this, they can only save drafts.
- Allow to Edit Published: You can edit your own published courses. This is handy for fixing mistakes or making updates.
- Allow to Edit Other: Gives the user permission to edit courses created by other users.
- Allow to Delete: The user can delete their own courses.
- Allow to Delete Published: Allows deletion of courses that have already been published. (own published courses)
- Allow to Delete Others: The user can delete courses created by other users. (draft)
- Allow to Delete + Allow to Delete Published + Allow to Delete Others: You can delete courses that other users have created, even if those courses are already published. This is a very strong permission.
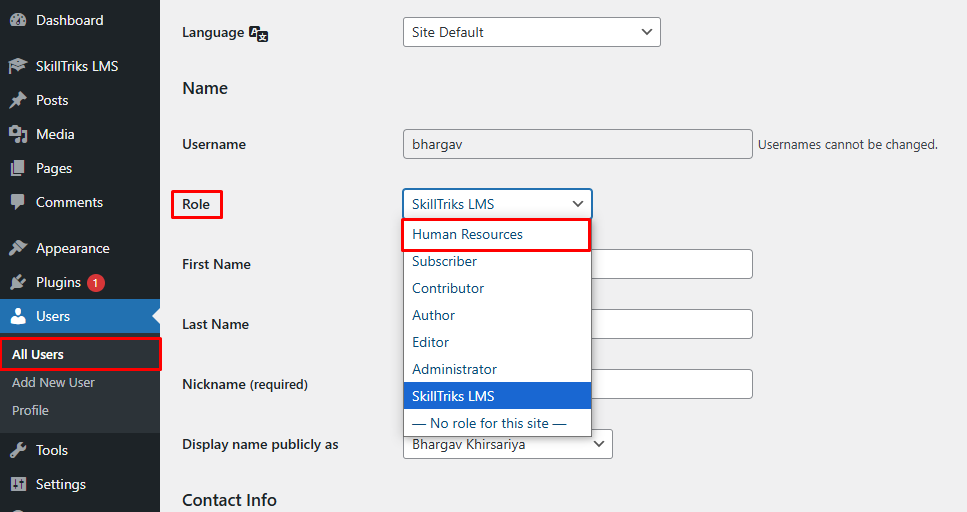
How do I assign user roles to the user?
- Go to All Users
- Edit the user’s profile.
- Choose a role from the role drop-down menu. (This list shows all available roles, and you can pick the one that gives the user the permissions you want.)
Assign Courses to Employees
The Assign Courses to Employees feature allows a Reporting Manager or Team Lead to allocate specific courses to one or more employees directly from the SkillTriks LMS system. This functionality helps managers ensure that required training programs are distributed efficiently and completed within the expected timeframe.
With this feature, managers can select a course and assign it to individual employees or multiple employees at once. An optional completion date can also be set, giving learners a clear deadline to complete their assigned training. Once assigned, employees receive a notification, ensuring they are informed about the new learning requirement.
Assigned courses can be accessed from two different locations on the frontend:
- The dedicated Assign Course page
- The Course Detail page
To display the Assign Course option on the frontend, navigate to the WordPress admin panel, open the User Role Editor, and provide the appropriate permissions that allow the user to assign courses to employees.
Create a New User Role for Assign Course
This process allows you to create a custom user role and grant it permission to assign courses from the frontend.
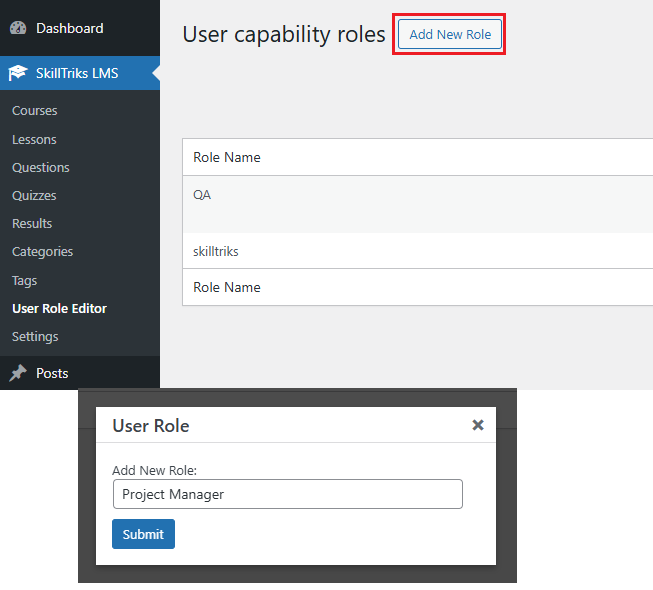
- Log in to your WordPress Admin Dashboard.
- From the left-hand menu, click on SkillTriks LMS.
- Select User Role Editor.
- Click the Add New Role button.
- Enter a name for the new role (e.g., Project Manager).
- Click Submit to create the role.
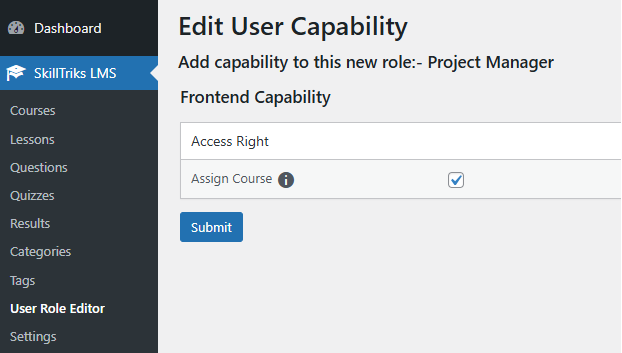
In the permissions panel, go to the Frontend Capability section.
- Enable the Assign Course checkbox.
- Click Submit again to save the permissions.
Assign Course Rights to a User
After creating the role, you must assign it to the appropriate user so they can access the course assignment feature.
- In the WordPress admin panel, go to Users → All Users.
- Find the user you want to update and click Edit.
- Locate the Role dropdown menu in the user profile page.
- Select the newly created role (e.g., Project Manager).
- Click Update User to save the changes.
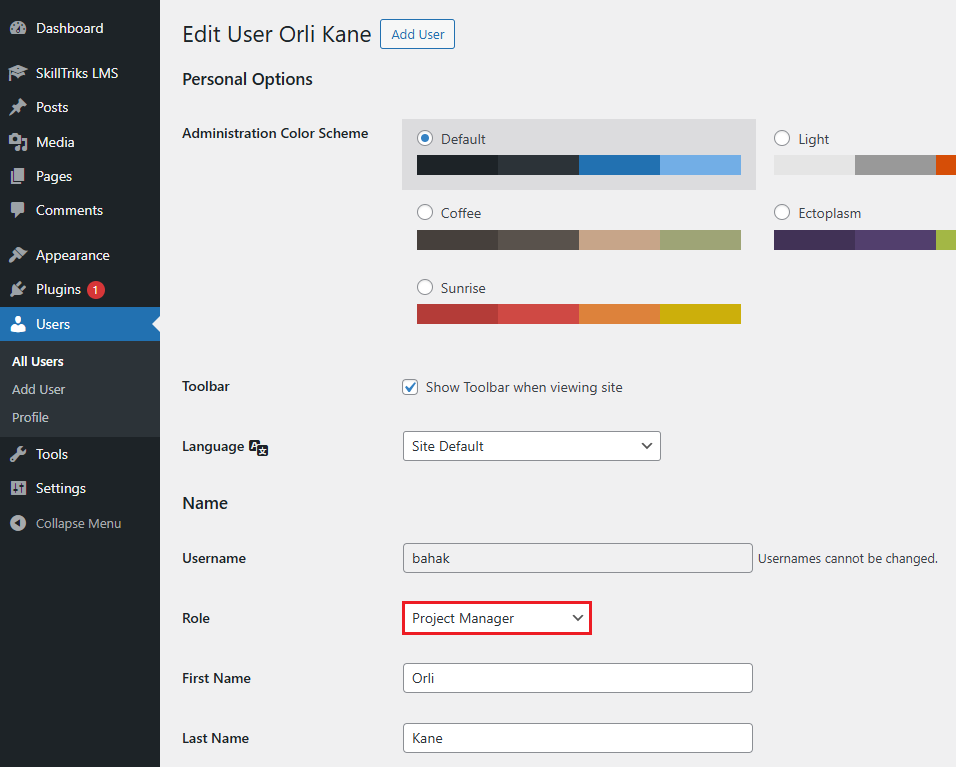
The selected user will now be able to assign courses from the frontend side.
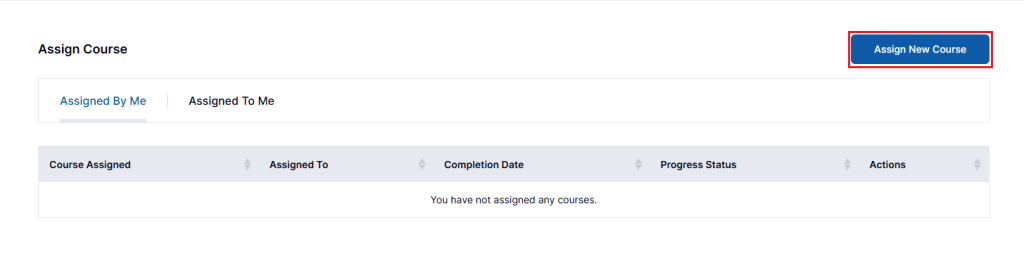
Method 1: Assign Course from the Dedicated Page
Use this method to assign a new course directly from the Assigned Course section in the user account area.
- Log in to your SkillTriks LMS website from the frontend.
- Click on the My Account dropdown in the top-right corner.
- Select Assigned Course from the menu.
- On the Assign Course page, click the Assign New Course button.
- The Assign New Course page will open, allowing you to proceed with assigning the course.
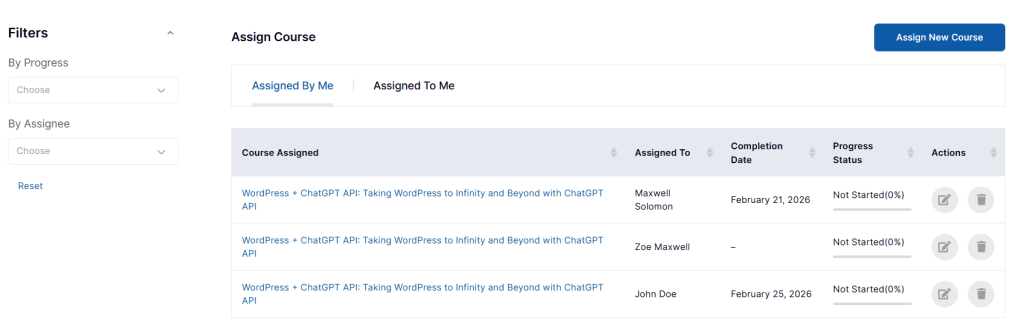
The Assigned Courses page provides a centralized view of all course assignments related to you. It allows Reporting Managers or Team Leads to track both the courses they need to complete and the courses they have assigned to their team members – all in one place.
This page is divided into two tabs to help you easily manage and monitor learning activities.
- Assigned To Me: Displays the courses that have been assigned to you, either as an employee or as a Reporting Manager.
- Assigned By Me: Displays the courses that you have assigned to employees, allowing you to monitor their progress and completion status.
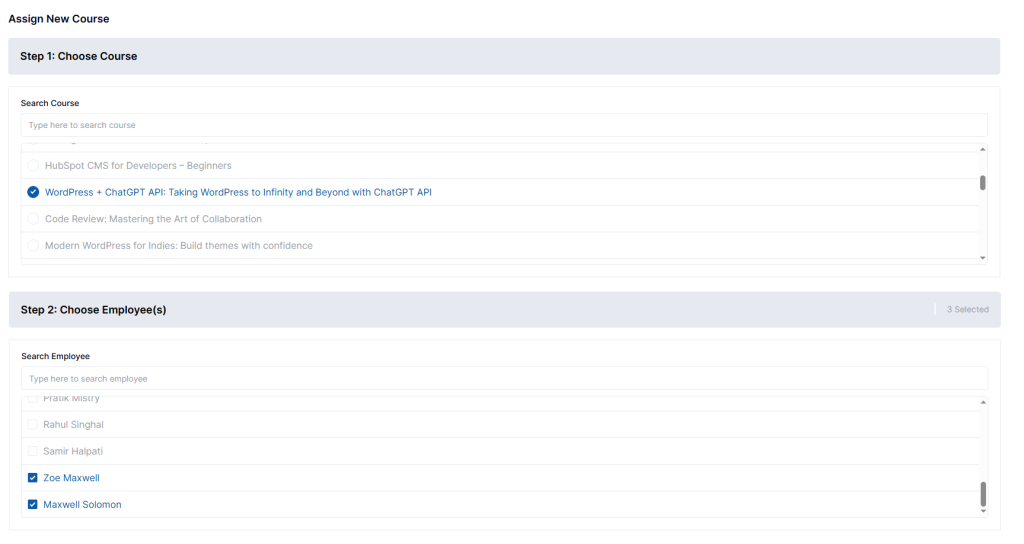
Assign New Course Form
The Assign New Course form allows the Project Manager or Team Lead to select a course, choose employees, and optionally define a completion deadline. The form is divided into three clear steps to make the assignment process simple and organized.
Step 1: Choose Course
All available courses on the platform are listed in this section. The Project Manager can browse or search for a course and select the one they want to assign. Only one course can be selected at a time for assignment.
Step 2: Choose Employee(s)
All registered users on the platform are displayed in this section. The Project Manager can select one or multiple employees for the chosen course.
If a course has already been assigned to certain users, those users will appear in a disabled state and cannot be selected again. Once one or more employees are selected, the option to set a completion date becomes available in the next step.
Step 3: Choose Completion Date
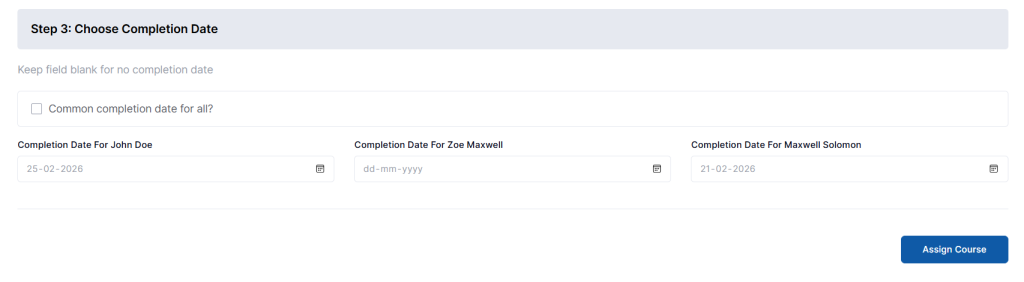
The Project Manager can optionally set a completion deadline for the selected employees. This ensures that the course is completed within a defined timeframe.
- Option 1: Common Completion Date for All
If the “Common completion date for all” checkbox is selected, a single date picker will appear. The selected date will apply to all chosen employees, and each must complete the course before that deadline.
- Option 2: Individual Completion Dates
If different deadlines are required, separate date pickers will be displayed for each employee. Each employee must complete the course before their individually assigned completion date.
- Option 3: No Completion Date
If no completion date is selected, the course will be assigned without a deadline. Employees can complete the course at any time.
After completing all the required steps, click the Assign Course button to finalize the assignment. The selected course will be assigned to the chosen employee, along with any specified completion date.
Once successfully assigned, the record will immediately appear in the Assigned By Me table, where you can track progress, view completion status, or manage the assignment.
Method 2: Assign Course from the Course Detail Page
This method allows you to assign a specific course directly from its detail page without navigating to the dedicated Assign Course section.
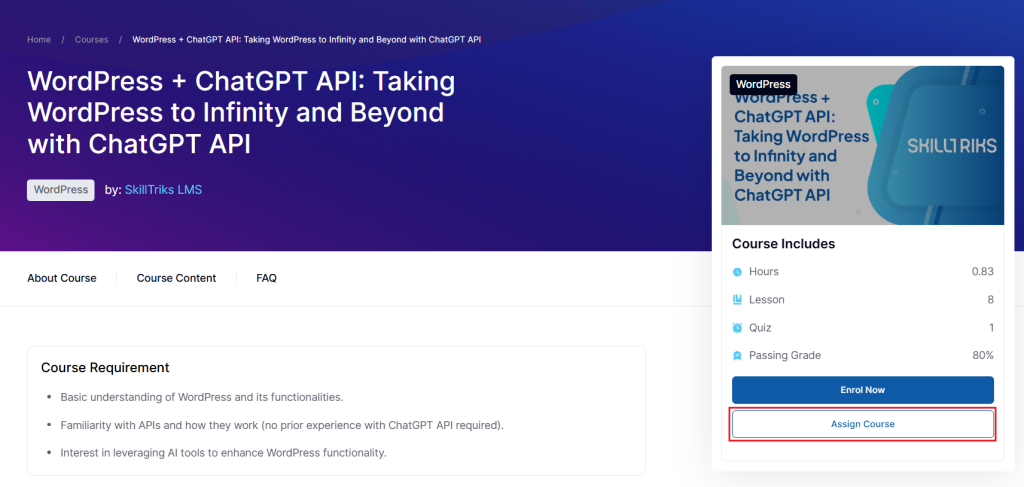
- Log in to your SkillTriks LMS website from the frontend.
- Navigate to the Course Detail page of the course you want to assign.
- Click the Assign New Course button available on the course page.
- The Assign This Course pop-up window will open, allowing you to select employees and set an optional completion date.
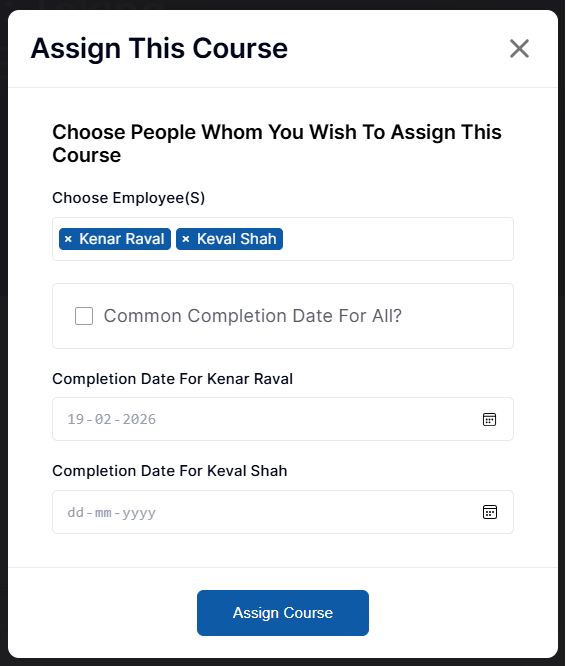
Step 2: Choose Employee(s)
All registered users on the platform are displayed in this section. The Project Manager can select one or multiple employees for the chosen course.
If a course has already been assigned to certain users, those users will appear in a disabled state and cannot be selected again. Once one or more employees are selected, the option to set a completion date becomes available in the next step.
Step 3: Choose Completion Date
The Project Manager can optionally set a completion deadline for the selected employees. This ensures that the course is completed within a defined timeframe.
- Option 1: Common Completion Date for All
If the “Common completion date for all” checkbox is selected, a single date picker will appear. The selected date will apply to all chosen employees, and each must complete the course before that deadline.
- Option 2: Individual Completion Dates
If different deadlines are required, separate date pickers will be displayed for each employee. Each employee must complete the course before their individually assigned completion date.
- Option 3: No Completion Date
If no completion date is selected, the course will be assigned without a deadline. Employees can complete the course at any time.
After completing all the required steps, click the Assign Course button to finalize the assignment. The selected course will be assigned to the chosen employee, along with any specified completion date.
Once successfully assigned, the record will immediately appear in the Assigned By Me table, where you can track progress, view completion status, or manage the assignment.
Assigned By Me Page
The Assigned By Me page provides Reporting Managers or Team Leads with a clear overview of all the courses they have assigned to employees. It allows them to monitor each employee’s progress, track completion status, review assigned deadlines, and make updates when necessary, ensuring that team training stays on schedule and properly managed.
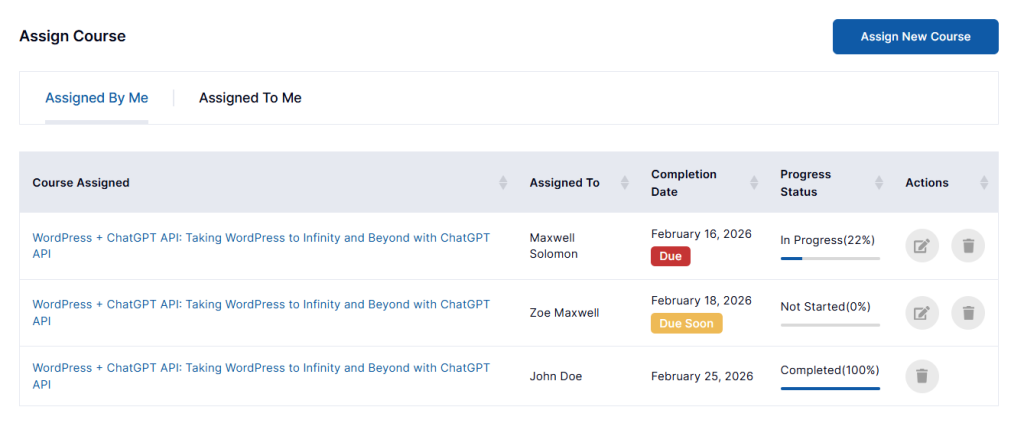
- Course Assigned: Displays the name of the course that has been assigned to the employee.
- Assigned To: Shows the name of the employee to whom the course has been assigned.
- Completion Date: Indicates the deadline by which the employee must complete the course.
- Progress Status: Shows the current progress of the employee in the assigned course.
Due Soon
Due Soon: Indicates that the course completion deadline is approaching within the number of days configured by the admin.
Steps to Change the Due Soon Value
- Log in to your WordPress Admin Dashboard.
- From the left-hand menu, click on SkillTriks LMS.
- Select Settings.
- Enter the desired number of days in the Due Soon input field.
- Click the Save button to apply the changes.

If a course completion date falls within the number of days configured in the Due Soon setting, the Due Soon tag will automatically appear in the table. For example, if the admin sets the Due Soon period to 3 days, and today’s date is 16th February 2026 while the course completion date is 18th February 2026, the system will display the Due Soon tag because the deadline falls within the next 3 days.
Due: Appears when the course completion date is today’s date or has already passed.
Progress Status:
- Not Started: The employee has not begun the course.
- In Progress: The employee has started the course but has not yet completed it.
- Completed: The employee has successfully finished the course.
Actions:
- Edit Icon: Allows the Project Manager to modify or update the course completion date, this option is not available once the course is completed.
- Delete Icon: Allows the Project Manager to remove (unassign) the course from the employee.
Assigned To Me Page
The Assigned To Me page allows employees to view a complete list of all courses assigned to them in one place, helping them easily track their learning activities, monitor progress status, and stay aware of upcoming deadlines.
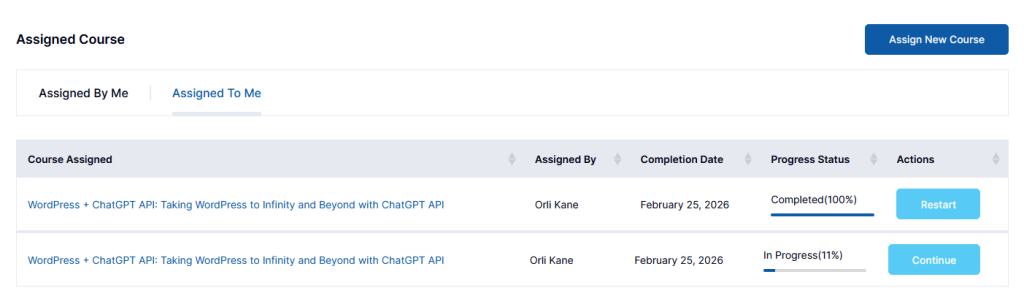
The layout and table structure are the same as the Assigned By Me page, with the only difference being the options available in the Actions column.
- Continue: Allows the employee to resume and continue the course from where they left off.
- Restart: Allows the employee to restart the course after it has been completed.
SkillTriks Settings: Login
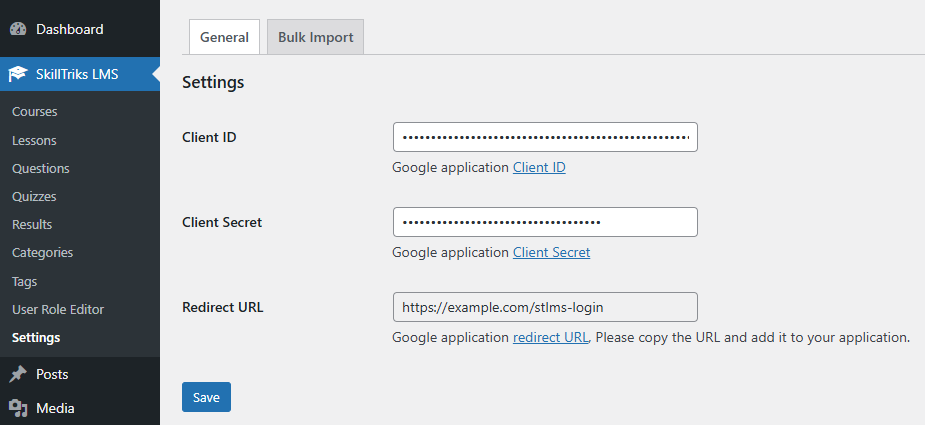
Single Sign-On ID (SSO Login)
Admin Side:
The Single Sign-On (SSO Login) feature allows admin to integrate Google authentication with the SkillTriks LMS platform. To enable this feature, the admin must enter the Google application Client ID and Client Secret in the SkillTriks Settings page and configure the provided Redirect URL in their Google Cloud Console application.
Once these credentials are saved, the SSO login option becomes active, allowing users to securely log in using their Google accounts without creating a separate username and password.
Frontend Side:
On the login page, users will see a “Sign In with Google” button below the standard login form. By clicking this button, users are redirected to Google for authentication, and upon successful verification, they are automatically logged into the SkillTriks LMS system.
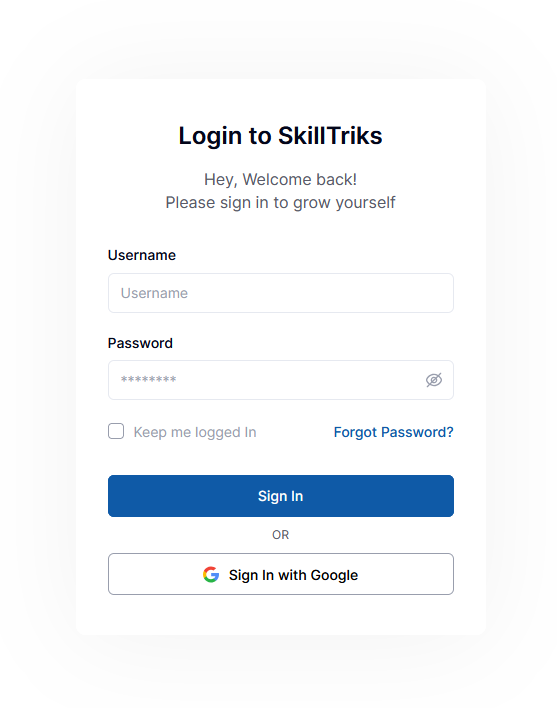
Users must first register on the SkillTriks LMS website, and only registered users will be able to log in to the platform. This provides a faster, secure, and seamless login experience, reducing the need to remember multiple login credentials.
Override Login
Admin Side:
The Override Login option allows the admin to enable or disable frontend login access for all users from the SkillTriks Settings page.
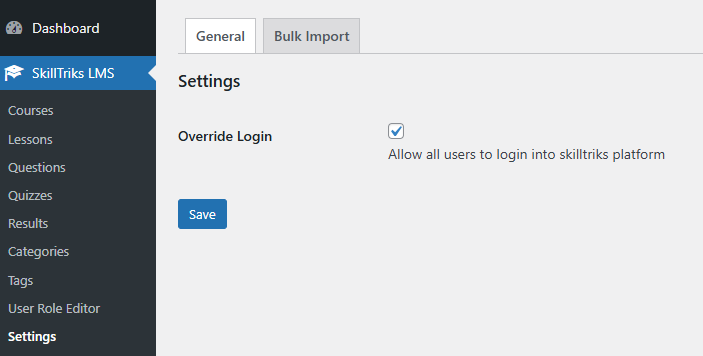
Frontend Side:
When Override Login is enabled, all registered users can log in from the frontend by entering a valid username and password.
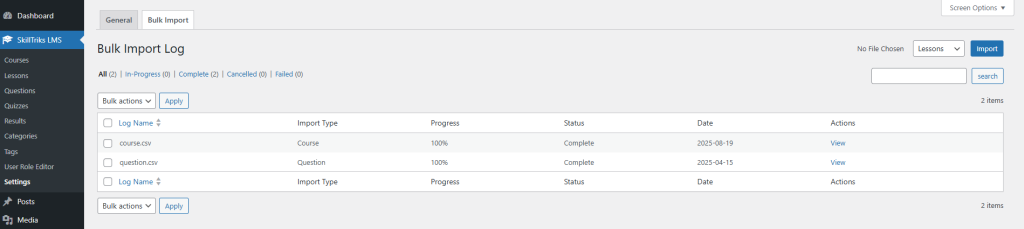
SkillTriks Settings: Bulk Import
The bulk import feature in SkillTriks Settings allows admin to efficiently upload multiple records at once using a CSV file, saving time and reducing manual data entry.
This functionality supports importing different types of content, including Questions, Lessons, and Courses, making it easy to quickly set up or migrate large amounts of LMS data. Once the file is uploaded and imported, the system tracks the progress and displays the import status in the Bulk Import Log for easy monitoring.
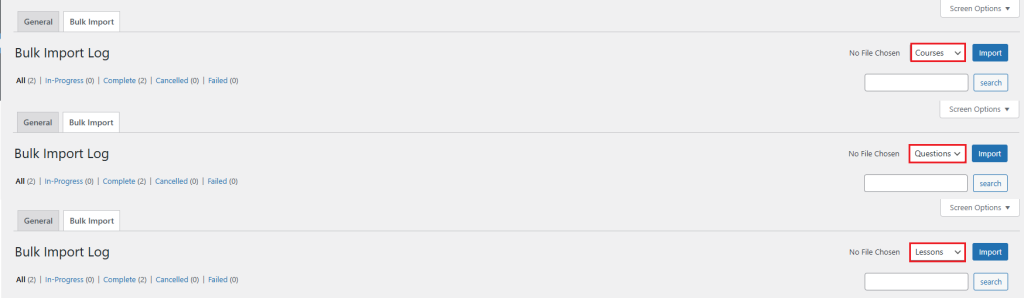
Questions Import
Use this option to bulk import multiple questions into the SkillTriks LMS using a predefined CSV format.
- Select Questions from the Import Type dropdown.
- Click the Import button.
- In the Upload Files section, choose the demo.csv file for Questions.
Note: This is a sample demo file for Questions. Modifying its format may cause the import process to fail.
Lessons Import
Use this option to bulk import multiple lessons into the SkillTriks LMS using a predefined CSV format.
- Select Lessons from the Import Type dropdown.
- Click the Import button.
- In the Upload Files section, choose the demo.csv file for Lessons.
Note: This is a sample demo file for Lessons. Modifying its format may cause the import process to fail.
Courses Import
Use this option to bulk import multiple courses into the SkillTriks LMS using a predefined CSV format.
- Select Courses from the Import Type dropdown.
- Click the Import button.
- In the Upload Files section, choose the demo.csv file for Courses.
Note: This is a sample demo file for Courses. Modifying its format may cause the import process to fail.
Account Settings: Frontend Side
The Account Settings page on the frontend allows users to manage their personal information, security settings, and preferences. From this section, users can update their profile details, change their password, upload a profile picture, and select preferred learning topics.
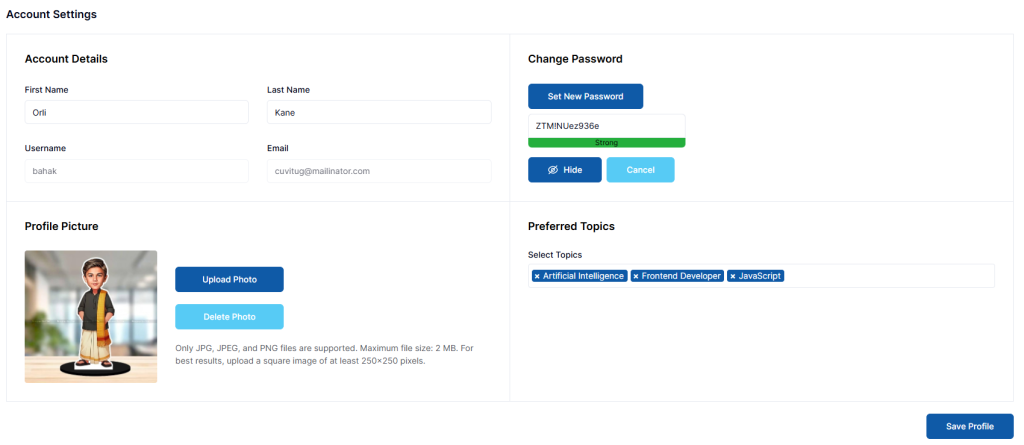
Account Details
- First Name: Users can update their first name to keep their profile information accurate and up to date.
- Last Name: Users can update their last name to keep their profile information accurate and up to date.
- Username: The username is system-defined and cannot be changed by the user.
- Email: The registered email address cannot be modified from the frontend account settings.
Change Password
- Set New Password: When the user clicks the Set New Password button, the system displays the default auto-generated password created by WordPress. Users can replace it with their own secure password before saving.
Preferred Topics
- Select Topics: This dropdown displays a list of available course categories. Users can select multiple topics based on their interests to personalize their SkillTriks Pro dashboard experience.
Notifications
The Notifications section provides important updates related to your assigned courses. It ensures that employees stay informed about course assignments, content changes, and deadline updates without needing to check each course manually.
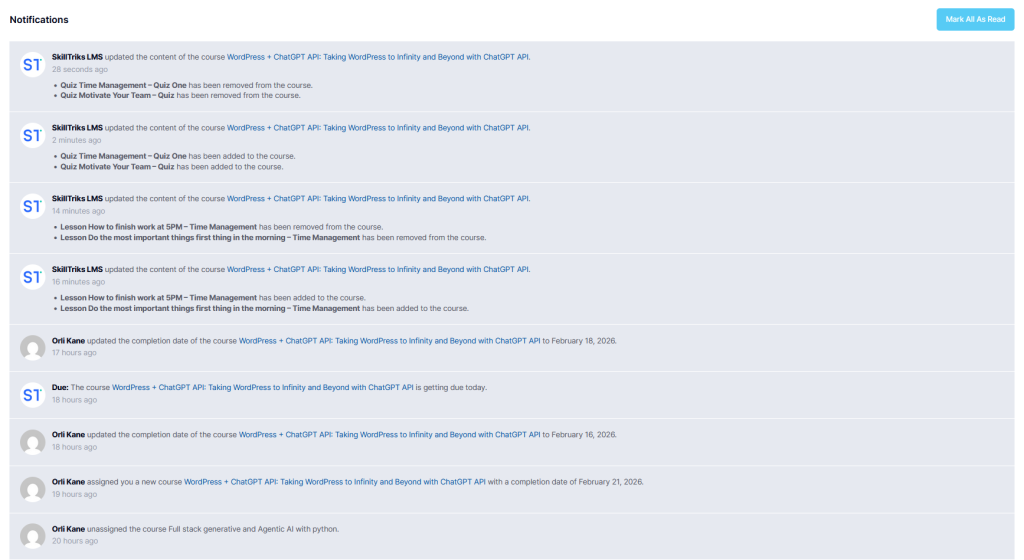
Whenever a Project Manager assigns a new course or unassigns an existing one, the employee receives an instant notification on this page. This helps employees clearly understand which courses they are responsible for and immediately recognize any changes to their learning plan.
Employees are also notified when lessons or quizzes are added to or removed from an assigned course. These notifications keep them aligned with the latest course structure and prevent confusion regarding updated learning materials.
In addition, the system sends notifications whenever a course completion date or due date is created or modified. This enables employees to effectively track deadlines, prioritize their tasks, and ensure timely course completion.
My Learning Page
The My Learning page displays all the courses in which a user is currently enrolled. It provides a clear overview of learning progress, allowing users to track completed, ongoing, and not-started courses in one centralized dashboard. From this page, users can start, continue, or review their courses while monitoring their progress status in real time.

Each course card displays key information, including the course title, duration, number of lessons and quizzes, completion percentage, and quick action buttons such as Start Learning, Continue Learning, or Download Certificate (if completed).
- Total Courses: Displays the total number of courses the user is enrolled in.
- Course Completed: Shows the number of courses that have been fully completed by the user.
- Course In Progress: Indicates the number of courses the user has started but not yet finished.
- Course Not Started: Shows the number of enrolled courses that the user has not yet begun.